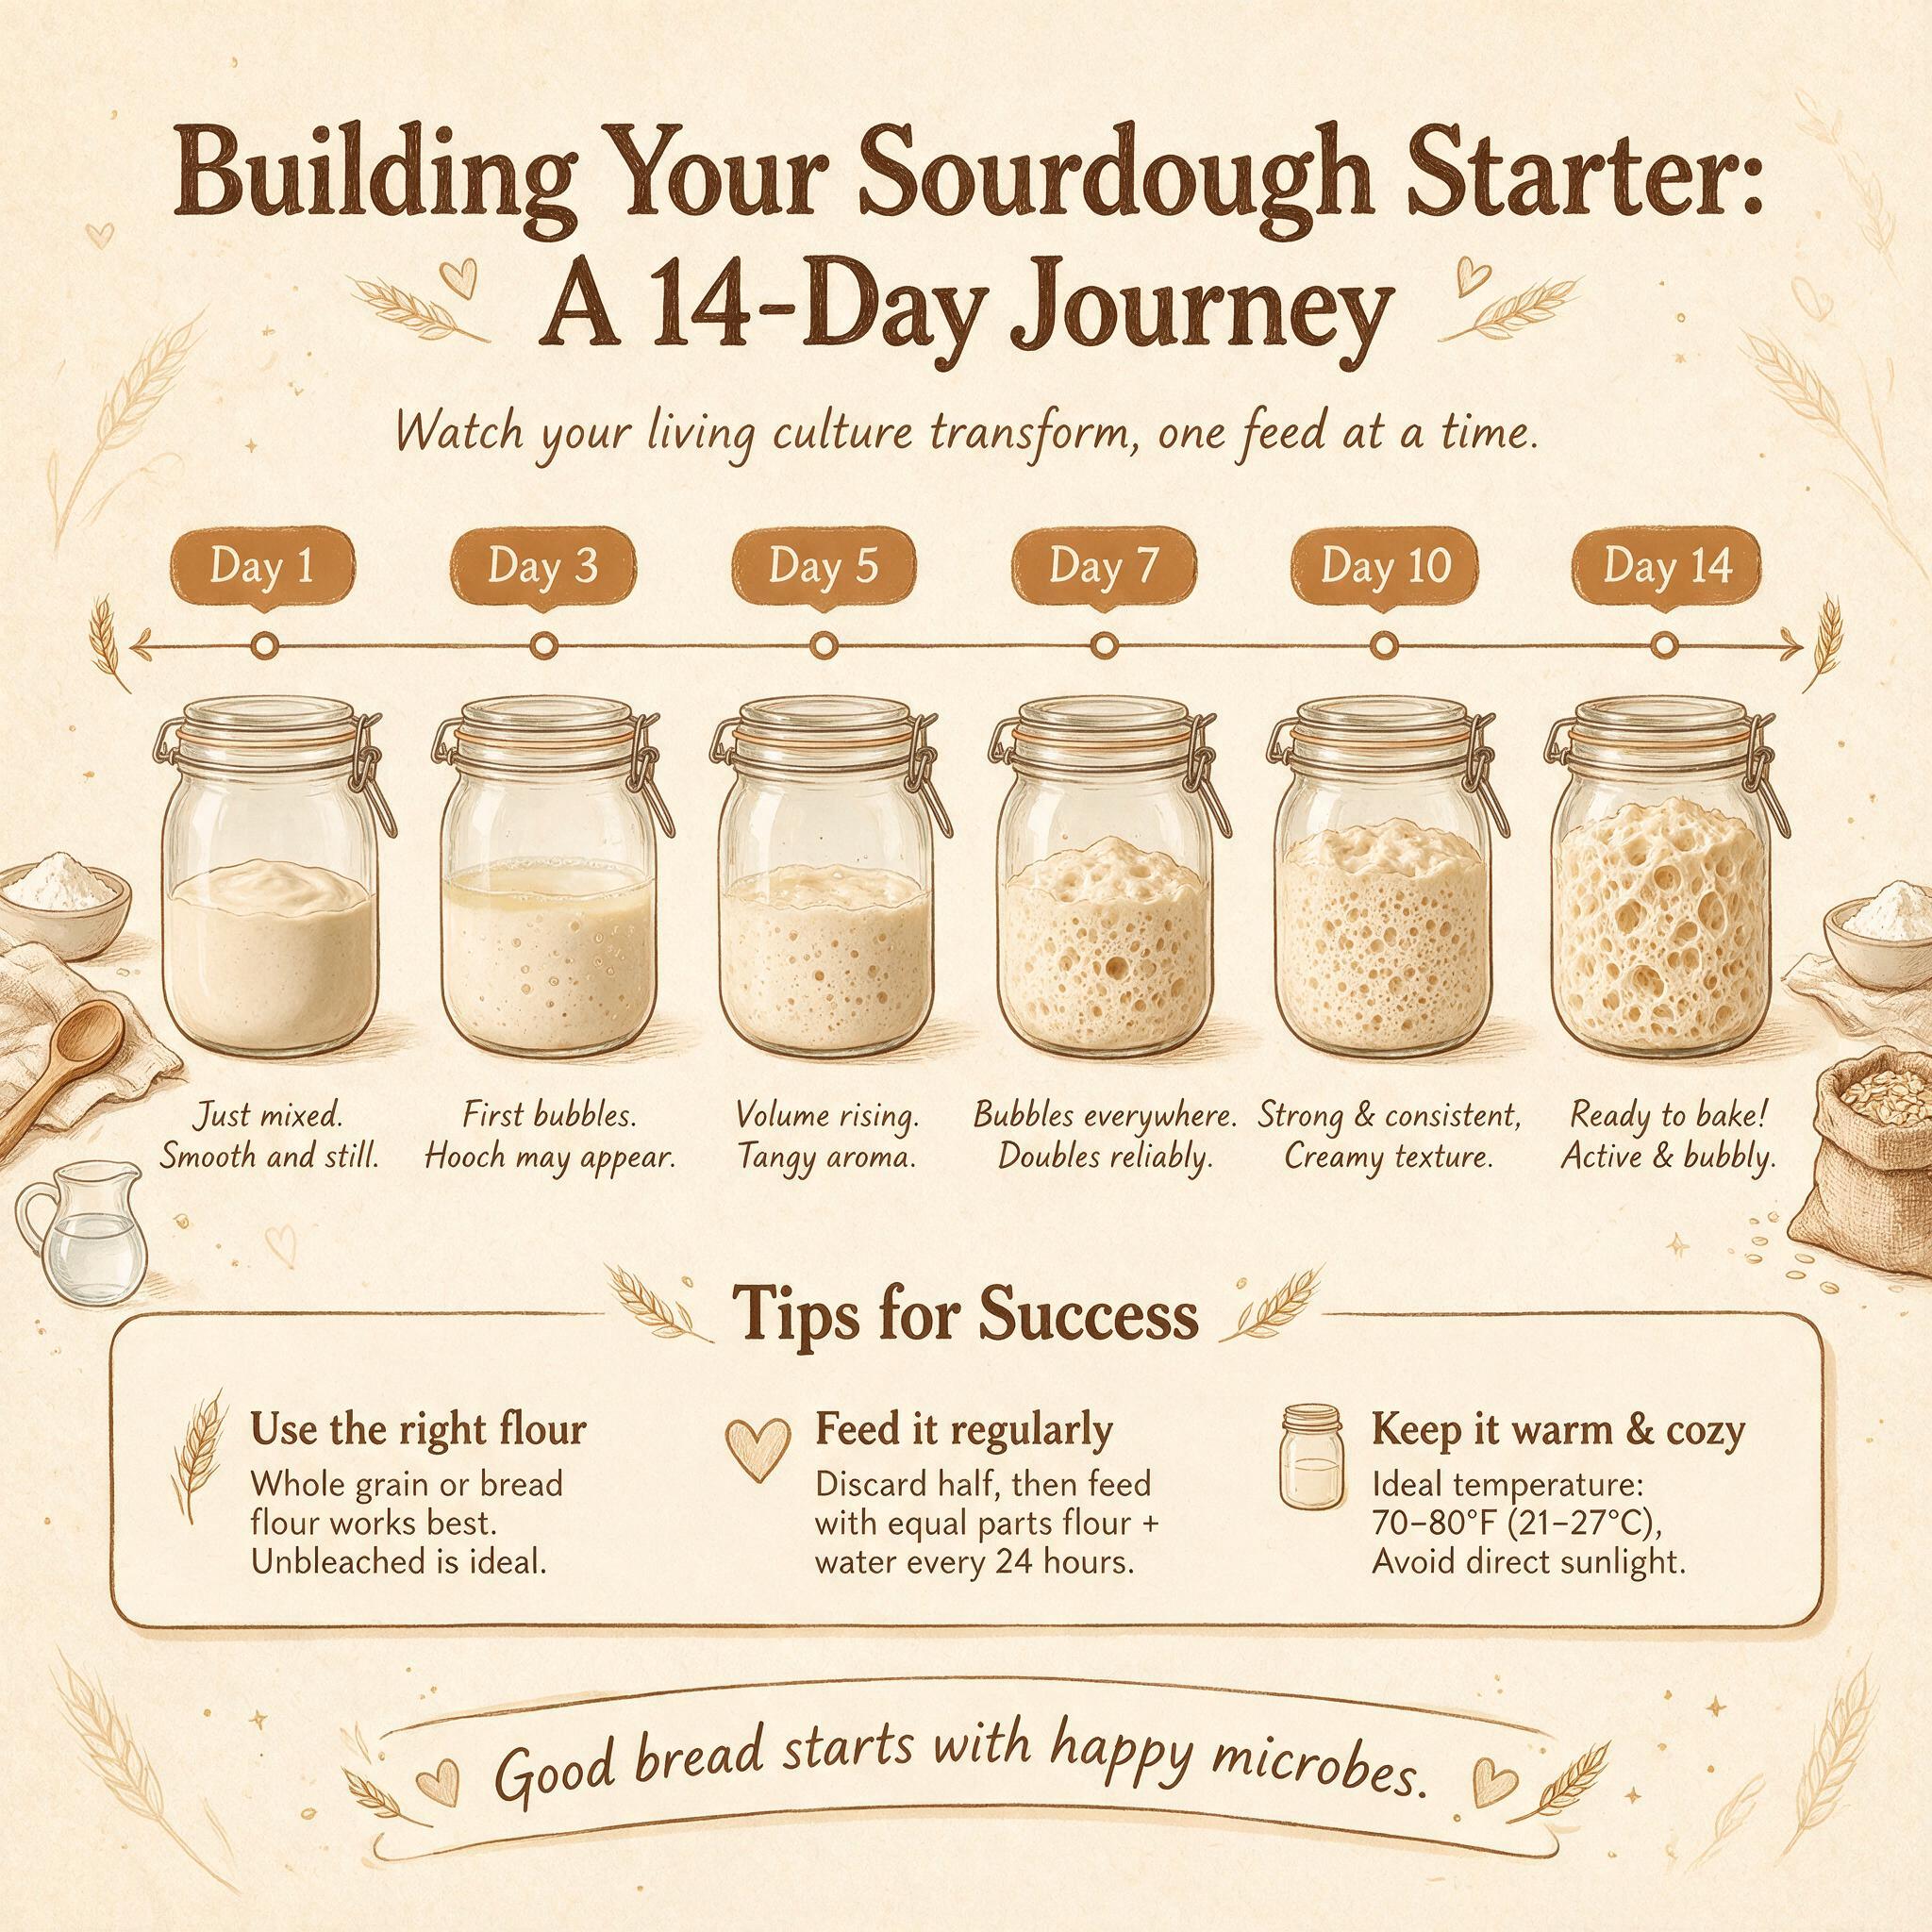
There's something almost magical about sourdough — flour, water, salt, time, and a living starter. But before you can bake your first loaf, you need to build that starter from scratch, which means mixing two ingredients together and waiting 10–14 days while they transform into a bubbling, breathing culture.
If you've never done this before, the process can feel mysterious (and occasionally discouraging). Your starter will look like it's working, then stop, then work again, then look dead, then come back to life. You'll wonder if something went wrong on day four when nothing is happening. Will it ever rise? Is that hooch good or bad? What does "peak" even mean for a jar of flour and water?
Here's the reassuring truth: every sourdough starter passes through three predictable phases, and almost everyone goes through the same confusing moments on their first bake. Your starter isn't broken — it's just doing what starters do.
This guide walks you through the full 10–14 day process, explaining what each day looks like, why things happen when they do, troubleshooting flat starters, how to know your culture is actually ready, and how to transition from creation feeding to maintenance routine.
What You'll Learn
By the end of this post, you'll understand:
- •The three microbial phases every starter goes through (and why day four looks dead)
- •Day-by-day expectations for building a starter from scratch
- •How to distinguish "false rise" from real activity
- •When your starter is actually ready for baking (it's not when it rises — it's when it peaks consistently)
- •Troubleshooting common problems: flat starters, slow starters, no bubbles
- •Your first feeding-to-baking transition
Let's walk through each day and demystify the process.
The Three Phases Every Starter Goes Through
Understanding these phases helps you stop panicking when your starter looks like it died on day four.
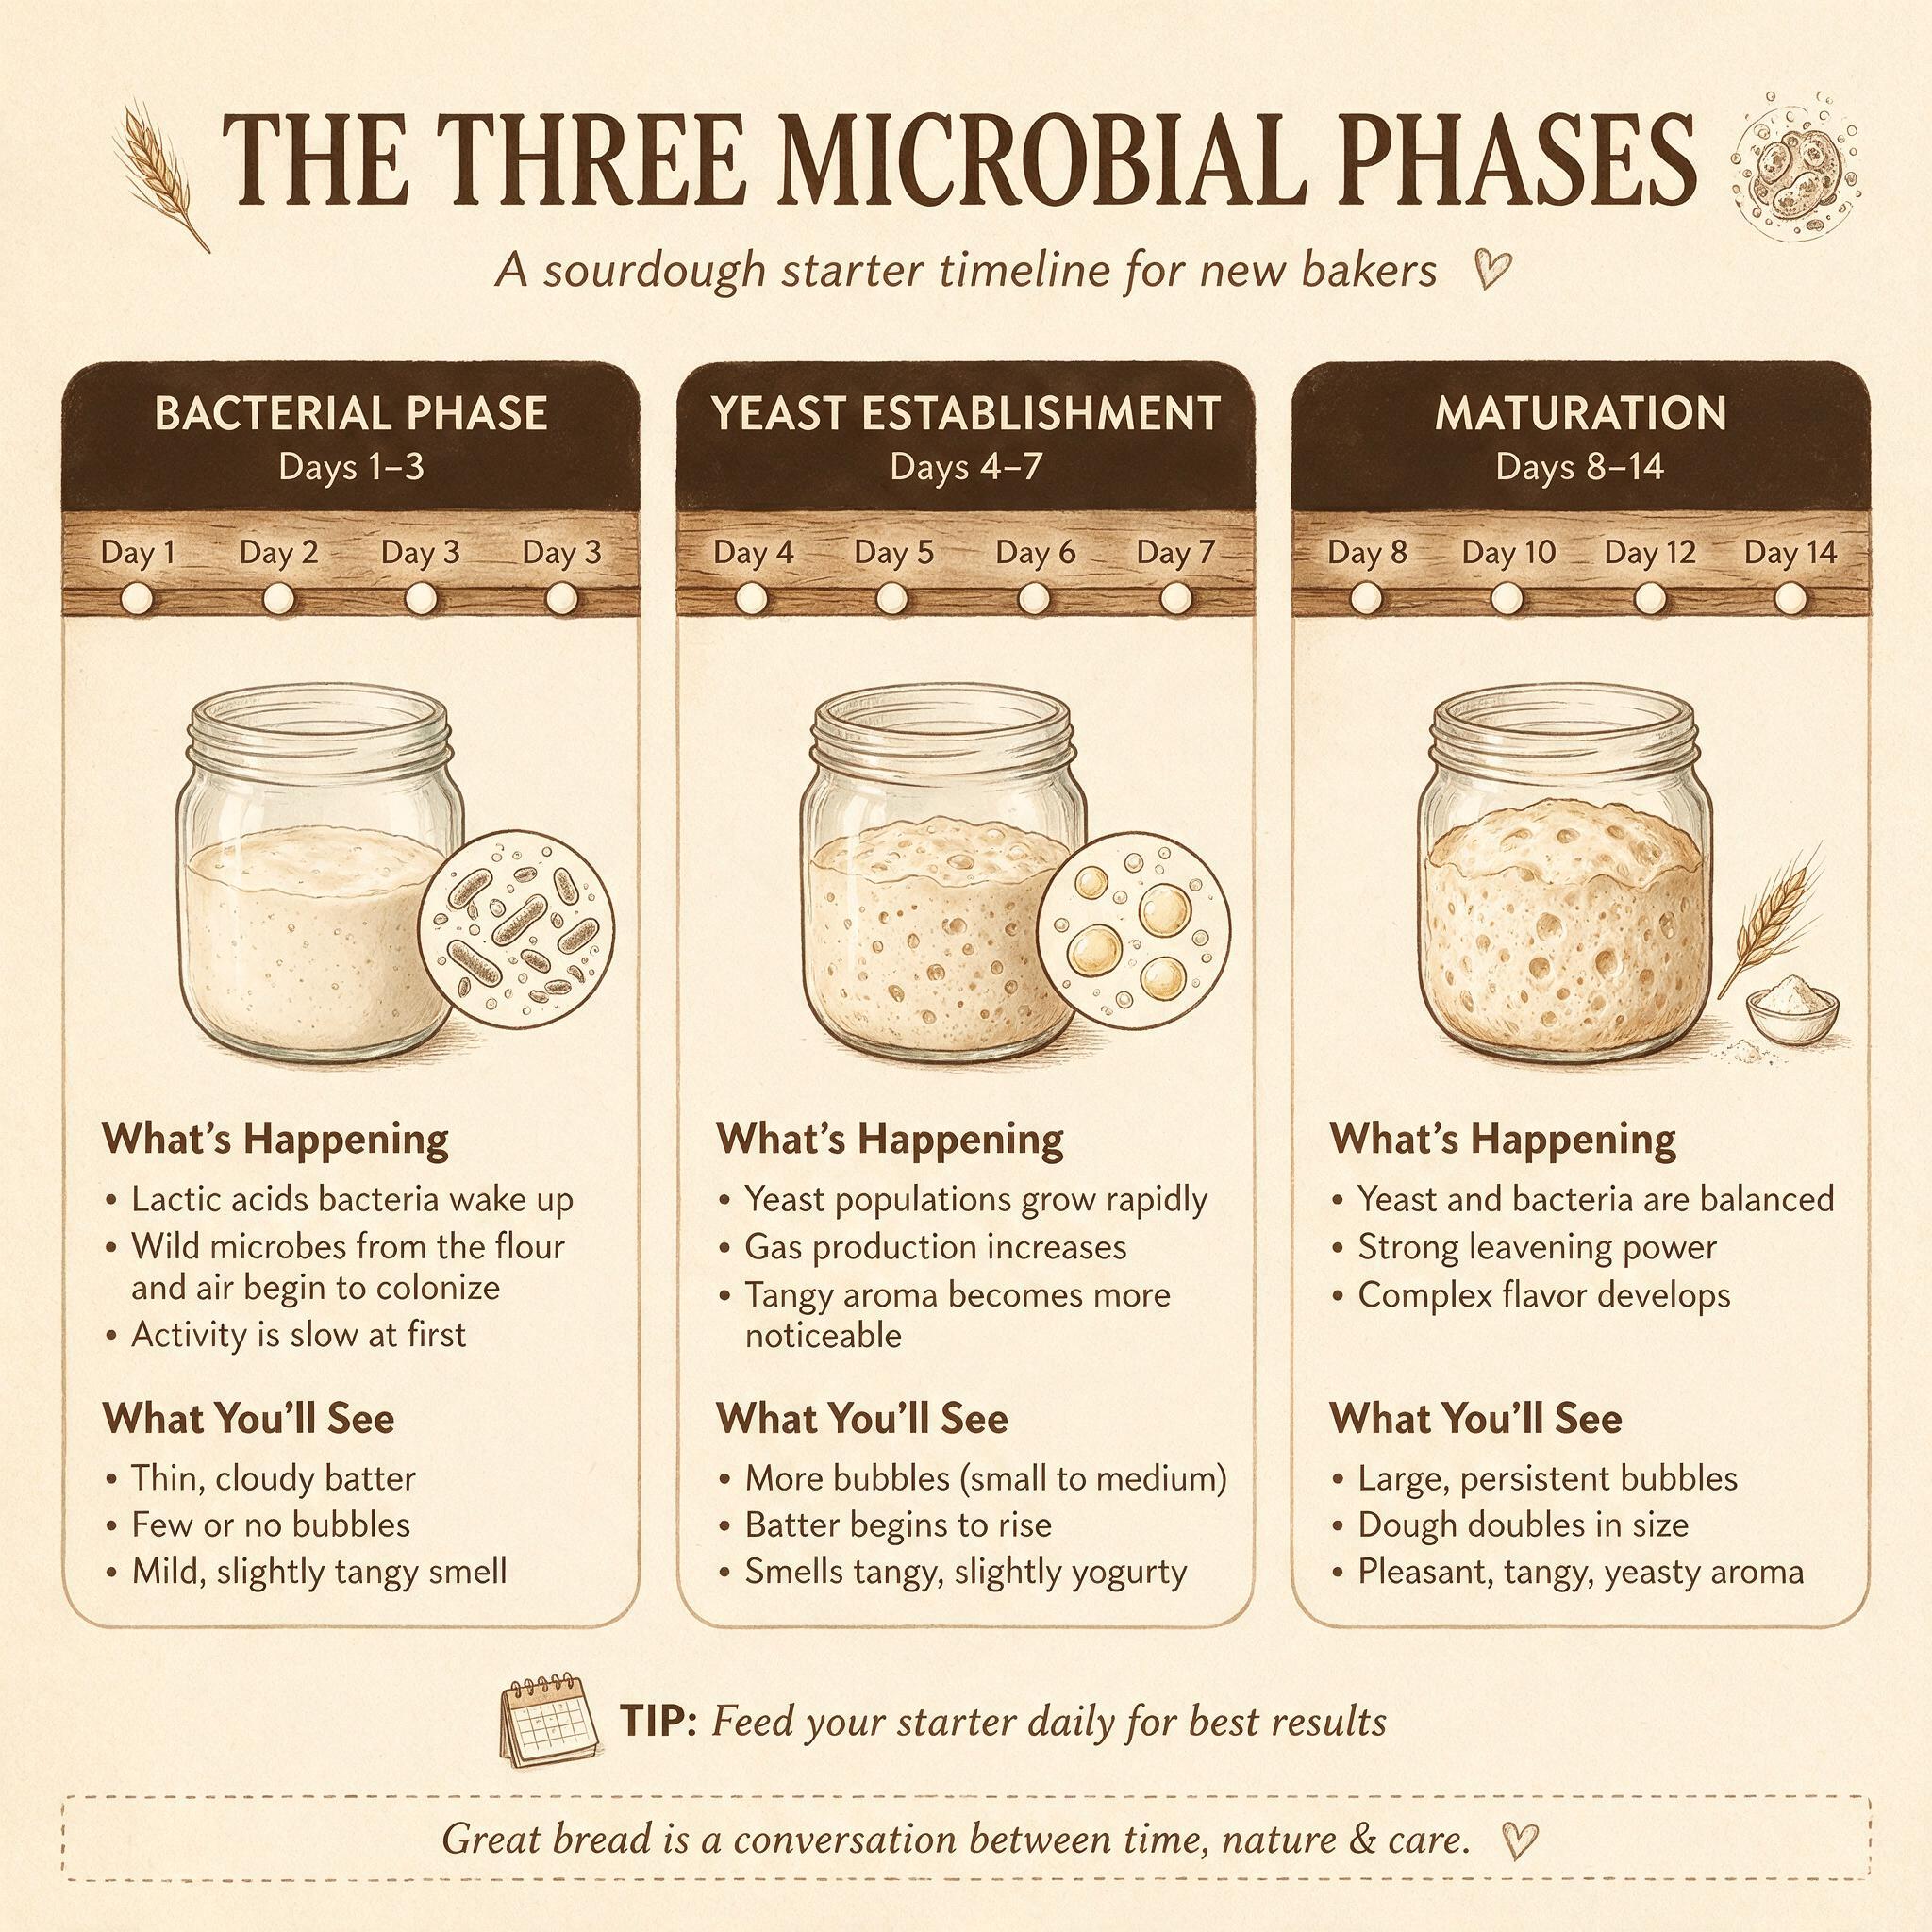
Phase 1: Bacterial Bloom (Days 2–3) — The "False Rise"
Your starter will bubble up, maybe even double in volume. It'll look triumphant and alive. But this is not yeast — it's Leuconostoc and Enterobacteriaceae bacteria blooming rapidly on the available sugars, then dying off as acidity builds. These early colonizers produce gas (bubbles) but also acid, which eventually kills them. The rise you see on day two or three is temporary — it peaks, then falls back.
The most important rule from The Sourdough Journey: never discard before peak activity. If you see 20 bubbles then 15, it peaked — feed it. Zero bubbles is not peak; keep waiting. Don't let a false rise convince you your starter failed.
Phase 2: Quiet Period (Days 4–6) — The "It's Dead" Phase
After the initial bloom collapses, your starter looks flat, lifeless, and possibly slightly watery on top (hooch). This is where most beginners give up. But nothing is wrong — the early bacteria have died off, and the real culture (Fructilactobacillus sanfranciscensis yeast and bacteria) is establishing itself in the jar. It's not dead; it's just quiet while the dominant organisms shift from generalist opportunists to acid-tolerant specialists.
This phase lasts 2–4 days depending on temperature, flour type, and your local microbial environment. In a warm kitchen (78°F+), this period may be shorter — sometimes you see bubbles return by day five. In a cooler kitchen (65–70°F), it can stretch to seven or eight days before real activity resumes.
Phase 3: Build Phase (Days 7+) — The "It's Working" Phase
Your starter begins doubling predictably after each feeding. Bubbles appear consistently within 4–8 hours of feeding, peak at roughly the same hour each time, and hold their volume for a couple hours before slowly falling. This is when your culture has become functionally mature — pH stabilizes around 4, Lactobacillus reaches ~48% mean abundance (per NC State's Wild Sourdough Project), and the microbial community shifts toward climax species that thrive in acid.
Readiness sign: Your starter doesn't need to rise dramatically — it needs to peak consistently at the same hour after each feeding, day after day. Consistency is the real indicator of readiness, not height or bubble volume. Once your starter reliably doubles within four to six hours at room temperature and maintains that pattern for three consecutive feedings, it's ready for baking.
Day-by-Day: What to Expect
Day 1: Mix and Wait
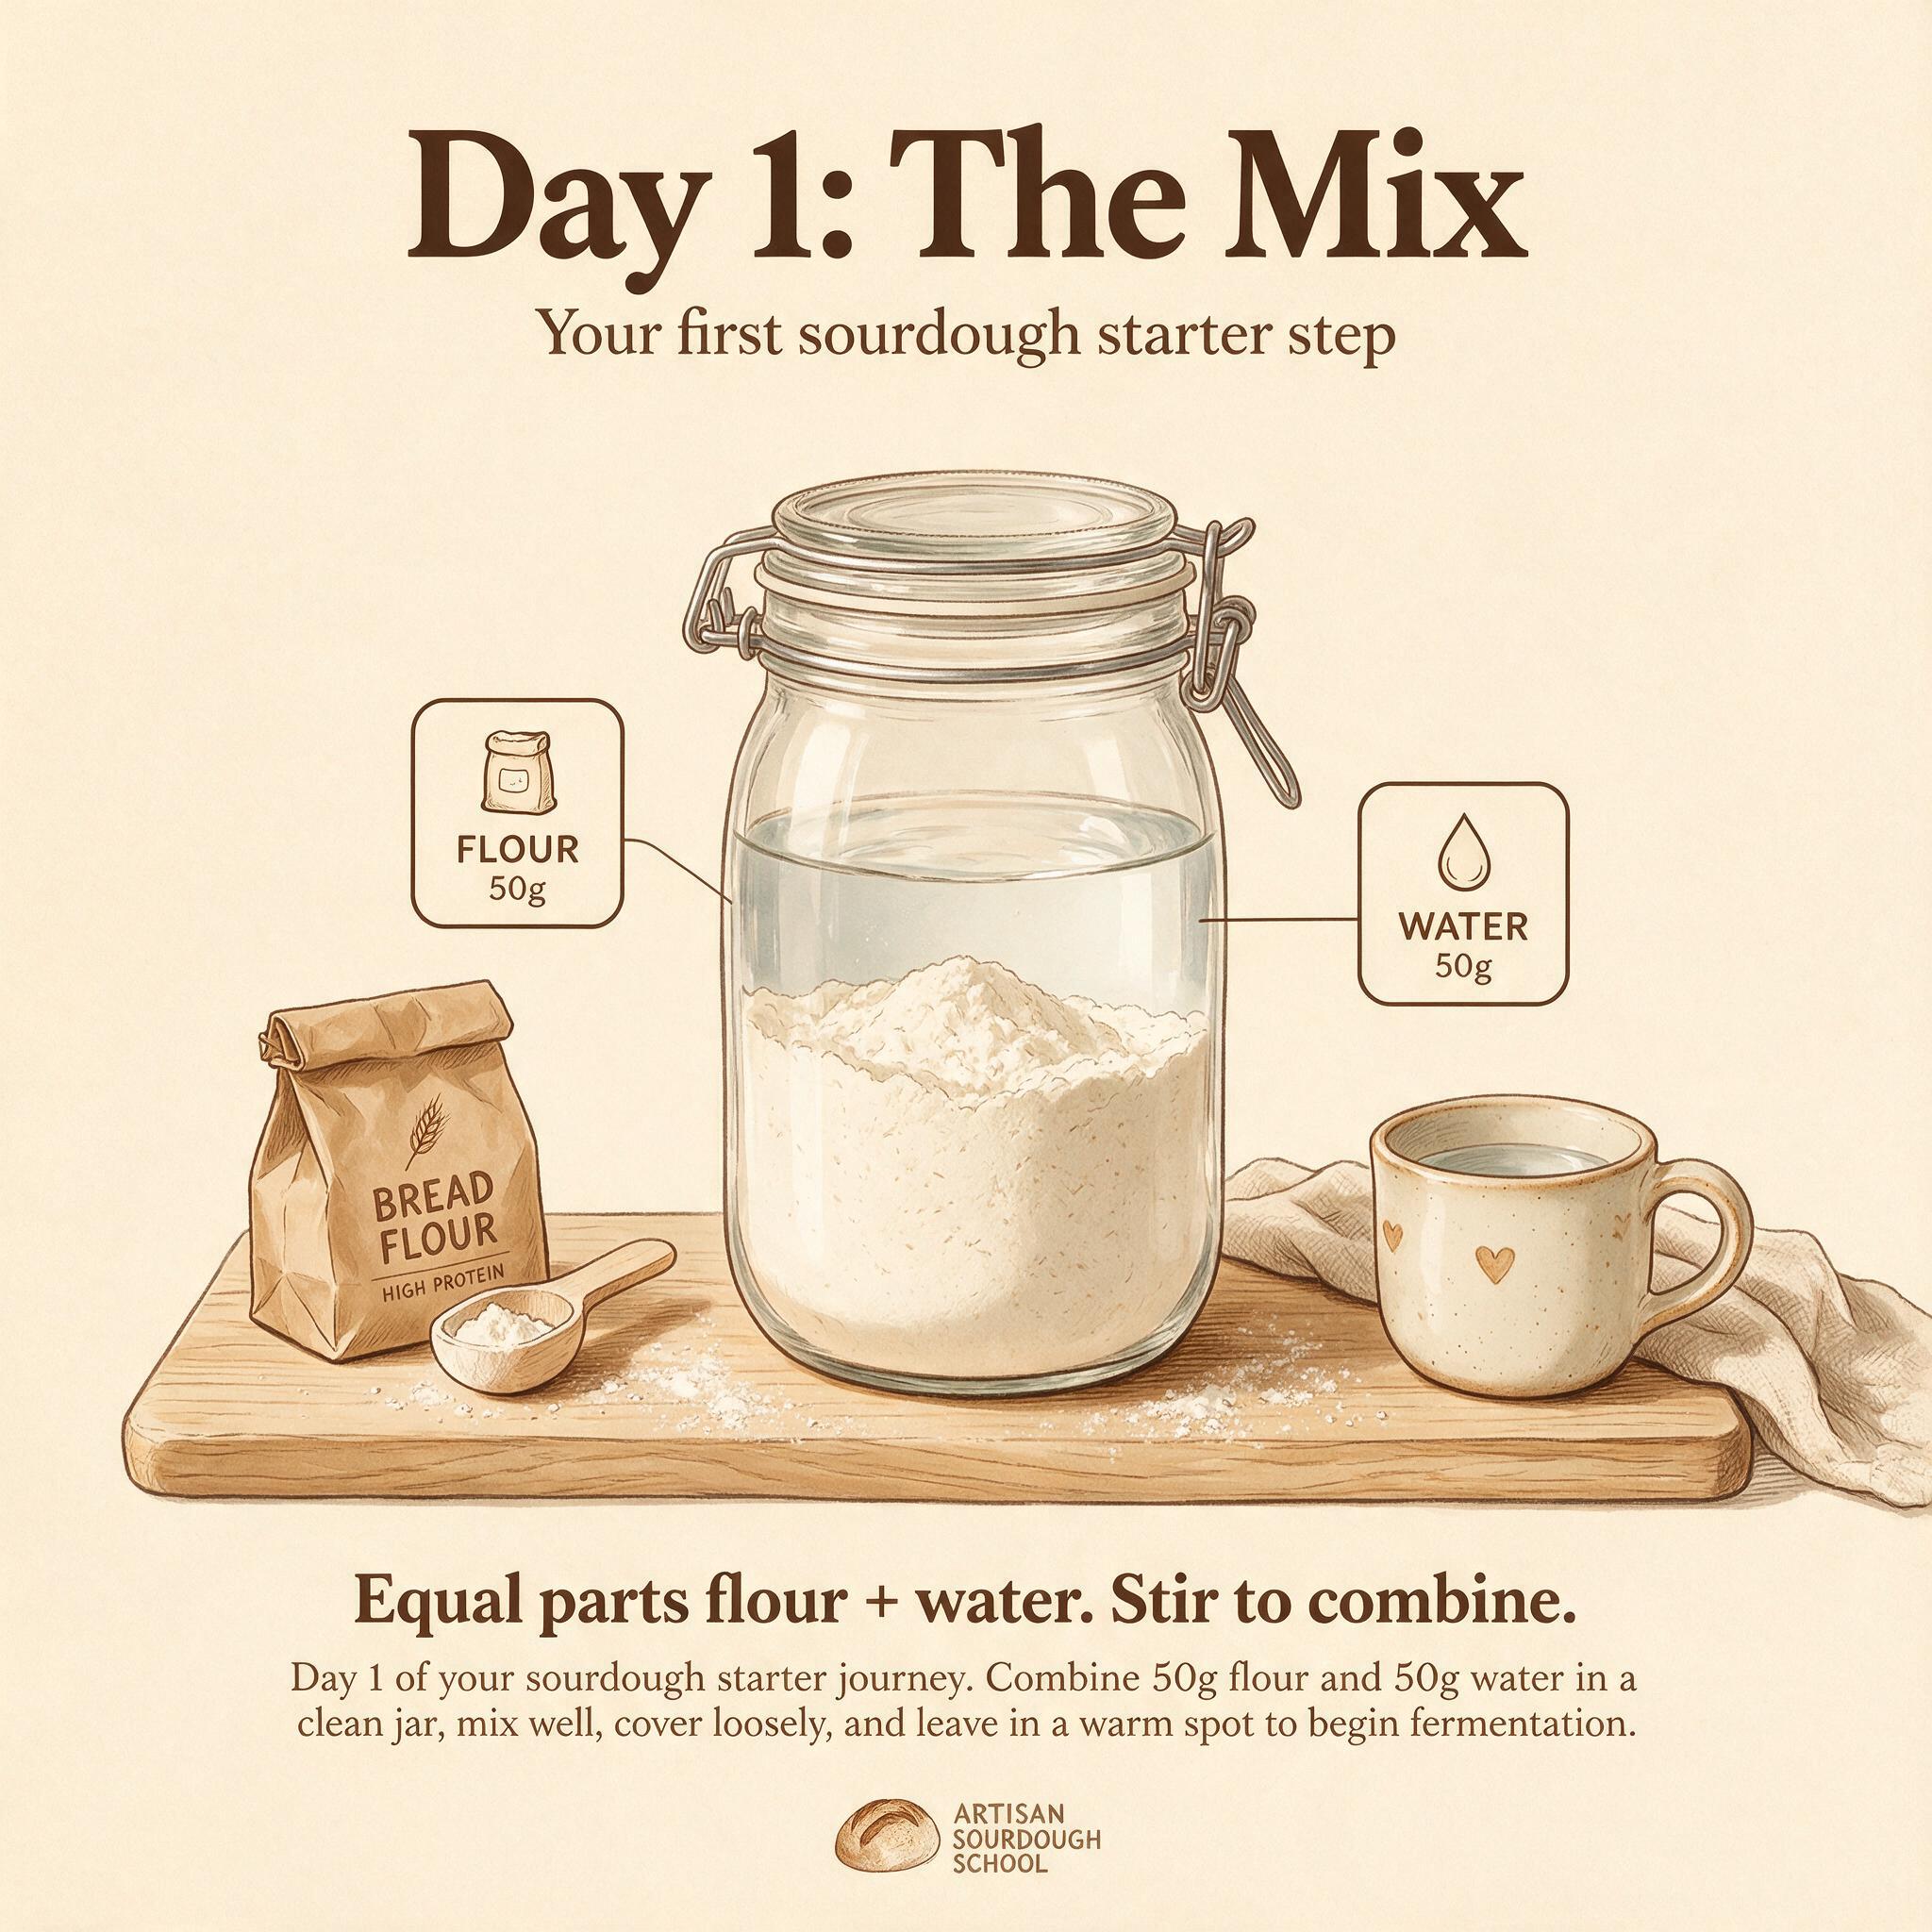
Action: Mix 50g whole wheat flour + 50g unchlorinated water (room temperature) in a clear glass jar. Stir until no dry bits remain. Cover loosely (lid not screwed on tight — the culture needs oxygen for initial colonization). Mark the starting level with a rubber band or tape.
What it looks like: Smooth paste, slightly bubbly from mixing air into the flour-water mixture. No real activity yet.
Tip: Whole wheat flour is recommended for day one because it's more biologically complex — rye is even better if you have it (the NC State study confirmed rye produces the most bacterial diversity). If using white flour, expect a slightly longer quiet period.
Day 2: First Activity
Action: Check your starter. You may see small bubbles forming on the sides of the jar and slight volume increase (10–30%). Stir it down — mix everything back together until smooth. Feed again with 50g flour + 50g water, stir well, mark level, cover loosely.
What it looks like: Bubbles appear, maybe some small froth on the surface. Volume increases slightly but not dramatically. Smell is mildly sweet and yeasty — pleasant, not sour. This is the early bacterial bloom starting.
Common experience: "My starter bubbled up this morning! It's working!" — Yes, it is (sort of). But don't get excited yet; this is the false rise phase. Keep feeding daily.
Day 3: Peak and Fall
Action: Check your starter in the morning. You may see a more pronounced rise — possibly doubling or nearly doubling from the previous level. Note when it peaks, then watch it fall back over the next few hours. When it starts to decline (bubbles deflate, surface sinks), stir down and feed again with 50g flour + 50g water.
What it looks like: The starter rises noticeably — maybe even doubles. Bubbles are abundant throughout the mass. Smell is stronger now: yeasty, slightly fruity, approaching tangy. Then it peaks and starts falling back. This peak-and-fall cycle is normal and expected.
Key milestone: Feed at peak (when volume is highest) rather than waiting until it's completely flat. Feeding at peak gives the new bacterial wave a head start on establishing dominance.
Day 4: The Quiet Period Begins
Action: Check your starter — it may look flat, possibly with a thin layer of hooch (dark liquid) forming on top. Stir the hooch back in or pour it off if you prefer. Feed again with 50g flour + 50g water. Mark level. Cover loosely.
What it looks like: Minimal to no visible activity. The starter may look exactly as it did yesterday — flat, dense, unremarkable. This is the quiet period where early bacteria have died off and the real culture is establishing. Do not discard. Do not give up. Keep feeding daily.
Common experience: "Nothing is happening. Is my starter dead?" It's not dead. It's just between generations of bacterial dominance — like a forest fire followed by regrowth. The old growth has burned; new growth hasn't appeared yet. Keep feeding.
Day 5: First Signs of Real Activity
Action: Check your starter. You may see very small bubbles appearing — scattered, not abundant, but present. Volume increase is minimal (maybe 10–20%). Stir down, feed with 50g flour + 50g water, mark level, cover loosely.
What it looks like: Tiny bubbles scattered throughout the mass, mostly on the sides of the jar. The starter doesn't rise dramatically but has a slightly looser texture than yesterday. Smell is becoming tangier — less sweet, more sour. This is the early establishment of Lactobacillus dominance.
Key milestone: Small bubbles are your first real sign that the climax community is establishing. It's not ready for baking yet, but it's getting there.
Day 6: Building Momentum
Action: Check your starter — you should see more consistent bubbling than yesterday, possibly slight volume increase (20–40%). Stir down thoroughly. Feed with 50g flour + 50g water, mark level, cover loosely.
What it looks like: Bubbles are more abundant and visible throughout the mass. The starter has a slightly frothy surface and may be starting to rise after feeding. Smell is noticeably tangy — sourdough character emerging. This is the build phase gaining traction.
Tip: If your kitchen is warm (78°F+), you may see this activity as early as day five or even four. In cooler kitchens, it might not appear until day seven. Both are normal.
Day 7: First Predictable Rise
Action: Check your starter — it should be rising noticeably after feeding, possibly doubling from the marked level. Note when it peaks and how long it holds volume before falling. Stir down at peak (or within a few hours of peak). Feed with 50g flour + 50g water, mark level, cover loosely.
What it looks like: A real rise — the starter increases in volume by 50–100% over several hours after feeding. Bubbles are abundant and consistent. Smell is distinctly sourdough: tangy, fruity, slightly yeasty. This is your first "real" fermentation cycle.
Key milestone: The starter is now functionally active — it produces gas reliably after feeding. Not quite ready for baking (it needs more consistency), but the culture is established.
Day 8–9: Building Consistency
Action: Feed daily as before, but start tracking patterns. Note when your starter peaks each day and how long it holds volume. You may notice the peak time shifting — if it peaked at hour six yesterday, it might peak at hour four today. This is the culture adapting to regular feeding and becoming more efficient.
What it looks like: More predictable rises with consistent timing. The starter should be doubling within 4–8 hours of feeding (depending on kitchen temperature). Bubbles are abundant throughout, surface is frothy, smell is complex — sour, fruity, yeasty all at once.
Tip: Start experimenting with discard feeding ratios. Instead of 50g flour + 50g water every time, try discarding most of the starter (keep only 10–20g) and feeding that small amount. This builds a larger culture while reducing waste — you'll need more starter for your first bake anyway.
Day 10: Functionally Mature
Action: Your starter should now be consistently doubling within four to six hours at room temperature, peaking at roughly the same time each day, and holding volume for one to two hours before falling. Feed as usual and check readiness using the tests below.
What it looks like: A healthy, active culture that rises predictably after every feeding. Bubbles are abundant throughout the mass. Smell is complex — sour, fruity, yeasty, with depth. The starter has a lively, almost effervescent quality when stirred. This is functionally mature and ready for baking.
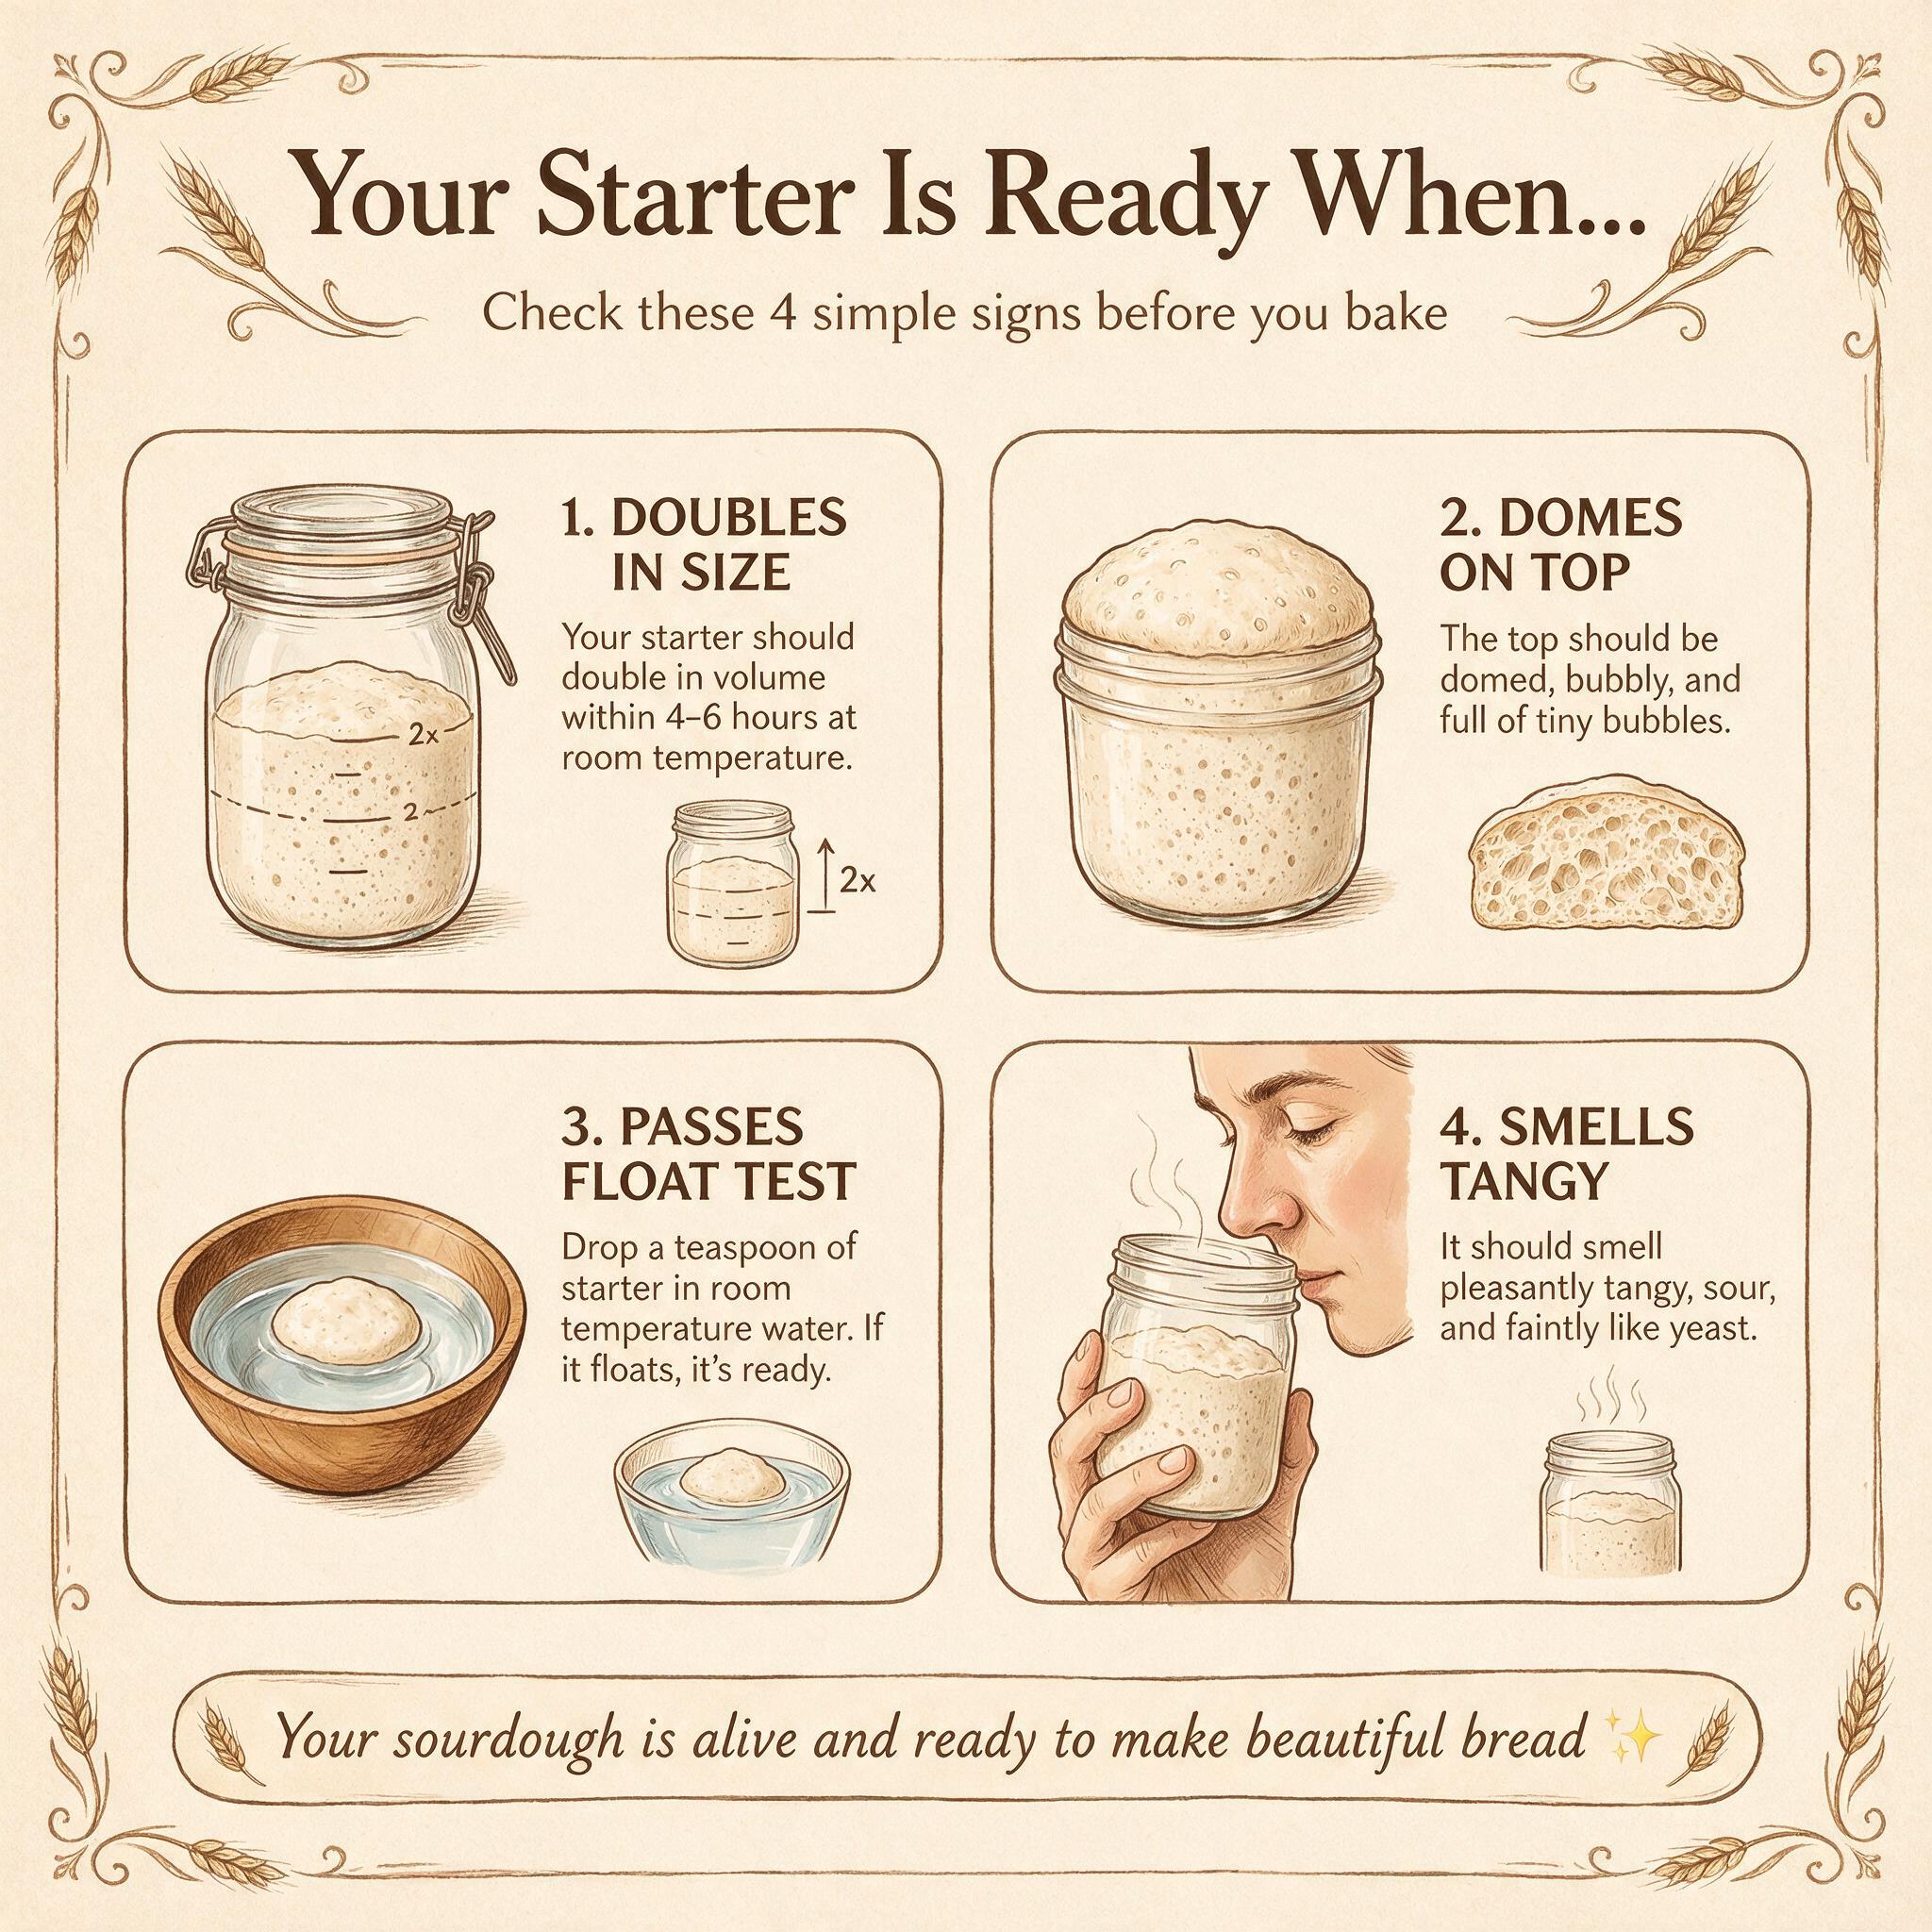
Readiness check: Your starter should pass these tests:
- •Rise test: Doubles in volume within 4–6 hours at room temperature after feeding
- •Float test: A teaspoon of starter dropped in water floats (not foolproof but useful)
- •Consistency test: Peaks at the same hour for three consecutive feedings
Troubleshooting: Common Problems and Fixes
"Nothing is happening on Day 4/5."
Likely cause: Quiet period between bacterial generations. This is normal — early bacteria died off, real culture hasn't fully established yet. In cooler kitchens (below 70°F / 21°C), this phase can last longer.
Fix: Ensure kitchen temperature is at least 70–75°F (21–24°C). If your apartment runs cool, place the jar in a turned-off microwave with a bowl of hot water nearby, or wrap it in a towel and set on top of the refrigerator (the motor creates gentle warmth). Keep feeding daily — don't skip.
"My starter smells like acetone/nail polish remover."
Likely cause: Starter is hungry — it's been sitting too long between feedings and has consumed all available food. Acetone smell means acetic acid bacteria are dominating because the culture is starving.
Fix: Feed immediately with fresh flour and water. Discard most of the starter (keep 10–20g) and feed at a higher ratio: keep 10g starter + 50g flour + 50g water. The excess food will restore balance within one feeding. If you feed more frequently, this won't happen.
"My starter has hooch but doesn't rise."
Likely cause: Hooch (dark liquid on top) is normal — it's alcohol and acetic acid produced during fermentation. A layer of hooch means the starter needs feeding soon. If your starter rises after feeding despite having hooch, everything is fine: stir the hooch back in or pour it off before feeding.
Fix: Feed regularly (once daily minimum). Stir down thoroughly each time — if you see hooch, that's just a reminder to feed, not an indication of failure.
"My starter smells bad (rotten, putrid)."
Likely cause: Contamination or extended neglect. A sourdough starter should smell tangy and fruity — not like rotting garbage. Rotten smell usually means the jar wasn't covered loosely enough (let in contaminants) or was left unfed for too long (more than 48 hours at room temperature).
Fix: Stir thoroughly and feed with fresh flour and water. If the bad smell persists after one feeding, discard most of the starter (keep 20g), feed generously (1:5:5 ratio), and monitor over the next two days. If it recovers with a normal sour/fruity aroma, you're fine. If rotten smell continues after second feeding, start fresh.
"My starter is slow — takes 12+ hours to peak."
Likely cause: Kitchen temperature too low or starter isn't fully mature yet (early in the creation process). In cool kitchens below 68°F/20°C, fermentation naturally slows down.
Fix: Increase kitchen temperature for feeding period (warm spot near appliance, proofing box, microwave with hot water bowl). If your starter is less than seven days old, slow peak times are normal — give it a few more days of consistent feeding before worrying.
Transitioning to Maintenance Feeding
Once your starter is functionally mature (around day 10–14), you can transition from creation feeding to maintenance:
For Frequent Bakers (3–5x per week)
- •Keep at room temperature, feed 1:1:1 ratio every 12 hours
- •This keeps the culture in constant peak activity — ideal if you bake daily or near-daily
For Weekly Bakers
- •Feed once daily at room temperature, then refrigerate after final feeding
- •Remove from fridge 24–48 hours before baking and build levain as normal
For Infrequent Bakers (1x per week or less)
- •Store in refrigerator, feed once a week
- •Remove 2 days before baking: feed at room temperature twice (12 hours apart), then use for baking
First bake tip: Use your starter when it's "just ripe" — risen noticeably, full of bubbles, pleasant sour aroma, loosened consistency. Don't wait until it peaks and starts falling; that means excess protease enzymes have built up, which weakens gluten during bulk fermentation.
Frequently Asked Questions

How do I know my starter is ready for baking?
The single best sign is not how high it rises but how consistently it peaks at the same hour after each feeding, day after day. If your starter doubles within 4–6 hours at room temperature and does this reliably for three consecutive feedings, it's ready. The float test (a teaspoon of starter dropped in water floats) is a useful secondary indicator — if it sinks, keep feeding; if it floats, you're likely close to readiness.
Can I speed up the process?
Yes, by controlling temperature. A starter at 80°F/27°C will establish faster than one at 65°F/18°C — typically completing the quiet period in 3–4 days instead of 5–7. Warm water (79–82°F / 26–28°C) for mixing also kickstarts activity. But temperature isn't everything: a slower starter in a cool kitchen develops a more robust microbial community over time because bacteria have longer to establish before the next feeding disrupts them.
Do I need whole wheat flour to start?
Whole wheat or rye is recommended for days one through three because they're more biologically complex — the NC State study confirmed rye produces the most bacterial diversity (30+ types at maturity). After your starter establishes, you can switch to feeding with white bread flour if that's what you primarily bake with. The bacteria will adapt within a few feedings.
How much starter do I need for my first loaf?
For a standard 500g-flour loaf, you'll need approximately 100–200g of active starter (20% of total flour weight). If your jar only has 100g after feeding, that's enough — just feed conservatively (keep 20g, add 100g flour + 100g water) to build a larger culture over one or two additional feedings before baking.
Can I freeze my starter?
Yes! Once your starter is mature and active, you can freeze it for long-term storage. Feed your starter as normal, let it peak, then transfer a portion (50–100g) to an airtight container or ziplock bag and freeze. To revive: thaw at room temperature, feed daily at 1:1:1 ratio until consistently doubling within 4–6 hours (usually takes 3–5 feedings). Frozen starter retains viability for months.
Closing Thoughts
Building your first sourdough starter is one of the most rewarding experiences in home baking — partly because you're cultivating a living culture that will become your kitchen's heartbeat for years to come, and partly because the process itself teaches you patience and observation in ways no recipe can.
The confusing part (days four through six) always feels like failure, but it's just biology doing what biology does: early colonizers bloom and die, then specialists take over. Every starter goes through this exact same transition — yours isn't broken, it's just mid-life.
My advice: trust the process. Feed daily at room temperature. Don't discard before peak activity. Watch for consistency rather than height or bubble volume. And when your starter finally peaks reliably on day ten or eleven and you pull your first loaf from the oven — that moment makes every day of waiting worth it.
Happy baking!