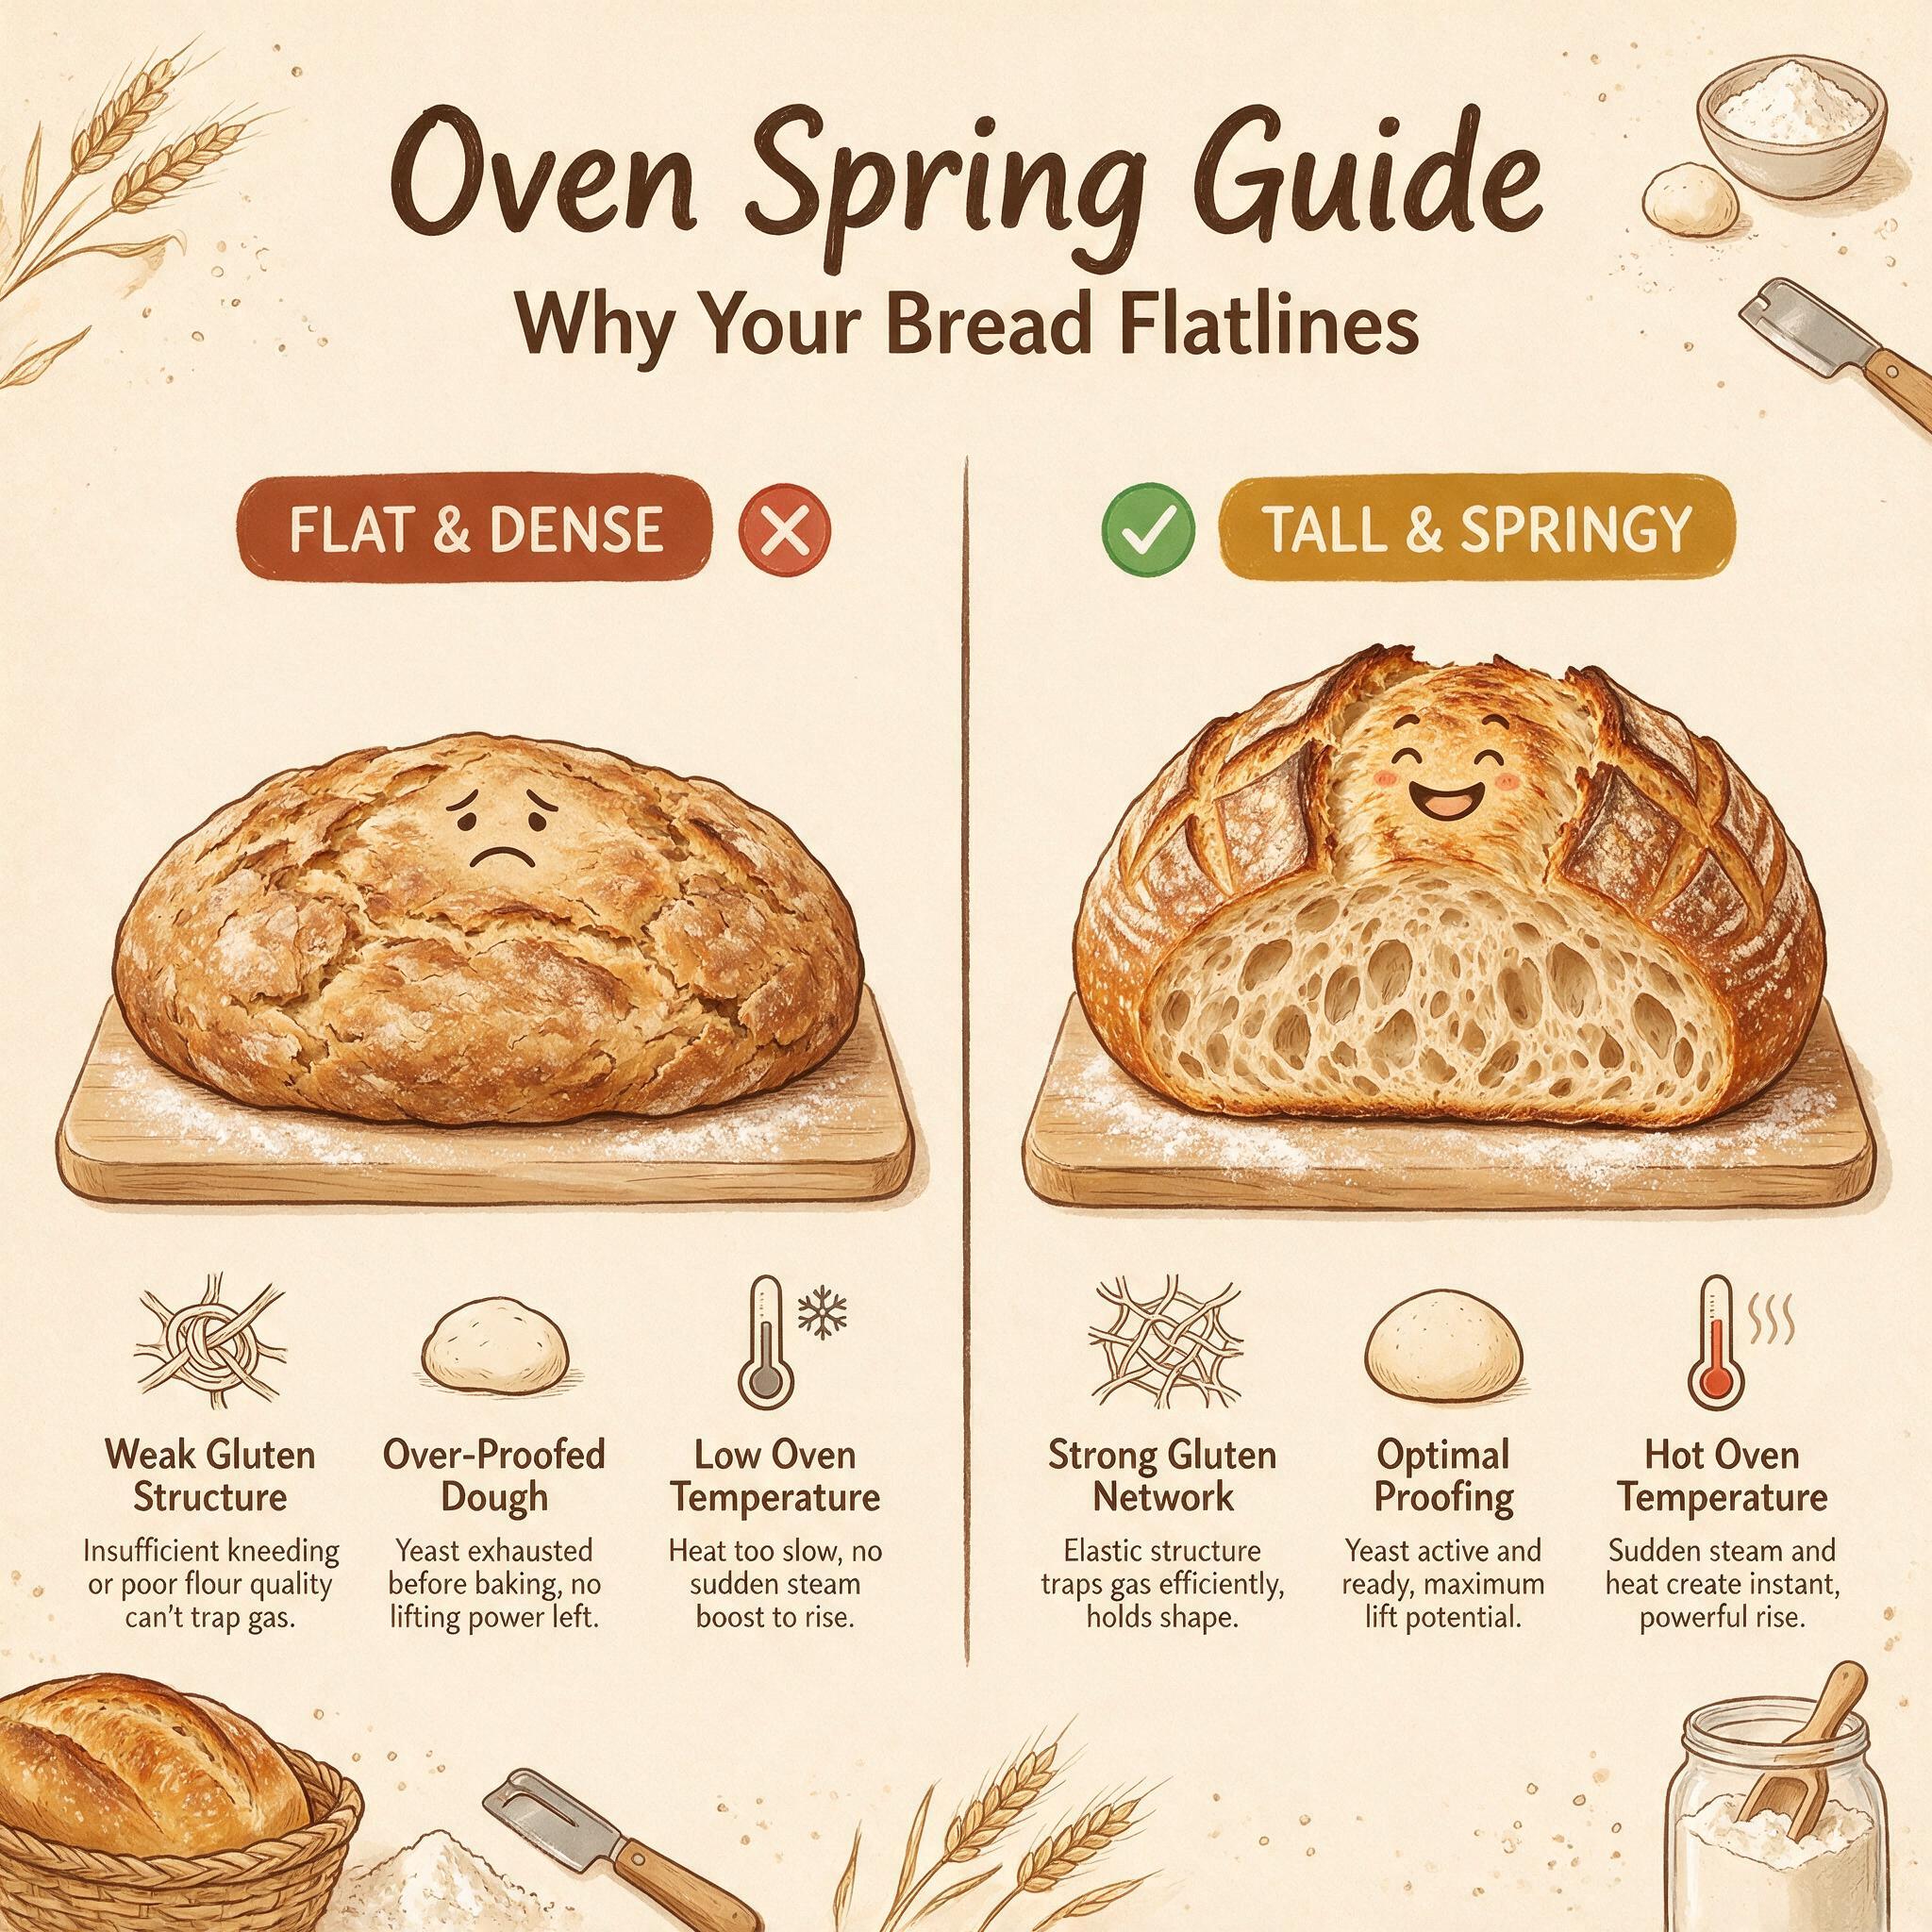
Oven spring is the dramatic final rise sourdough experiences in its first 10–20 minutes of baking. It's what transforms a shaped loaf into something that looks like it came out of a bakery — tall, proud, with a beautiful ear and dramatic expansion. And when it doesn't happen? Your loaf spreads flat, feels heavy, and leaves you wondering what went wrong.
Here's the thing most guides don't tell you: oven spring is driven by three simultaneous forces that kick in the moment dough hits heat — thermal gas expansion (~8–10%), dissolved CO₂ coming out of solution (~20%), and water vapor pressure pushing bubbles apart (30–32%). Together, they can produce up to 60% more volume during those first few minutes. But only if all five factors align: strong dough structure, proper fermentation timing, adequate steam, correct scoring technique, and sufficient oven temperature with thorough preheating.
If your bread flatlines, it's almost always one of these five things out of alignment. Let me walk you through each one — the science behind why it matters, what experienced bakers do differently, and how to diagnose which factor is limiting your loaves right now.
What You'll Learn
By the end of this post, you'll understand:
- •The five factors that determine oven spring (and why fermentation timing matters most)
- •How steam performs three critical functions during baking
- •Why preheating for 45–60 minutes matters more than your oven dial says
- •How scoring angle and depth control where expansion happens
- •A diagnostic order to troubleshoot flat results, from most likely to least
This isn't about memorizing rules — it's about understanding the mechanics so you can diagnose what's limiting your bread. Let's dive in.
Factor 1: Dough Strength at Bake Time
The gluten–starch matrix is the primary structure holding expanding gas cells during oven spring. It needs to be strong enough to stretch without rupturing while still extensible enough to allow expansion. A viscoelastic network of gluten proteins and starch must accommodate strain rates of roughly 0.001/s during biaxial gas cell expansion — if your gluten is too weak, the bubbles burst instead of expanding.
What Science Says About Acidification
As pH drops through sourdough fermentation (down to ~4.5), acetic acid, lactic acid, and succinic acid alter wheat flour protein secondary structure, reducing water-binding capacity and weakening the gluten network over time. This is why overproofed dough collapses rather than springs — maximum acidity means degraded gluten that can't hold gas under thermal expansion.
Best Practices Confirmed by Multiple Sources
- •Target flour protein: 11–13% for white bread flour. Above 13% becomes chewy and gummy; below 11% lacks structural strength. This is the sweet spot across Maurizio Leo (The Perfect Loaf), King Arthur Baking, and multiple academic sources.
- •Gluten development endpoint: Dough should pass a near-windowpane test — smooth, elastic, holding shape when stretched. Under-mixing is far more common than over-mixing among home bakers. When in doubt, mix longer than feels comfortable.
- •Autolyse helps dramatically: A 30–60 minute rest of flour + water before adding starter and salt increases extensibility by allowing natural enzymes to gently relax gluten bonds. Coined by French professor Raymond Calvel in 1974 as "the secret to extensibility," this remains one of the most underutilized techniques among home bakers.
- •Folding builds strength: Coil folds and stretch-and-folds during bulk fermentation strengthen the network without degassing. Most experienced bakers do four to six sets of coil folds spaced 30 minutes apart.
Whole Wheat Caveat
Bran particles physically cut gluten strands during mixing. A 20%+ whole wheat loaf will have less oven spring than an equivalent white flour loaf regardless of technique. Compensate by ending bulk earlier (40–50% aliquot rise) and building extra shaping tension to maximize what your dough can do.
The Weak Dough Trap
If dough feels shaggy, slack, or doesn't hold shape after mixing, oven spring will be limited regardless of scoring or steam. The fix is always more mixing or folding — never less. There's no such thing as "over-mixing" sourdough during bulk fermentation (unless you're doing aggressive hand-kneading for 20+ minutes straight).
Factor 2: Steam in the Oven
Steam performs three critical functions during the first 15–20 minutes of baking, confirmed by King Arthur Baking's testing and multiple academic sources:
1. Keeps crust extensible. Moist air prevents the surface from setting within the first three to five minutes, allowing maximum expansion. Without steam, the crust hardens and locks the loaf in place — this is the single most common cause of limited oven spring after proofing issues.
2. Gelatinizes surface starches. Creates a glossy, thin, crackly crust rather than thick and leathery. This isn't just aesthetic — it affects how your bread feels when you slice into it.
3. Enables scoring to bloom. Scores won't open properly without steam. King Arthur Baking's side-by-side test showed scored loaves with minimal steam barely opened at all, while the steamed version had dramatic expansion through every cut.
Best Practices Confirmed Across Sources
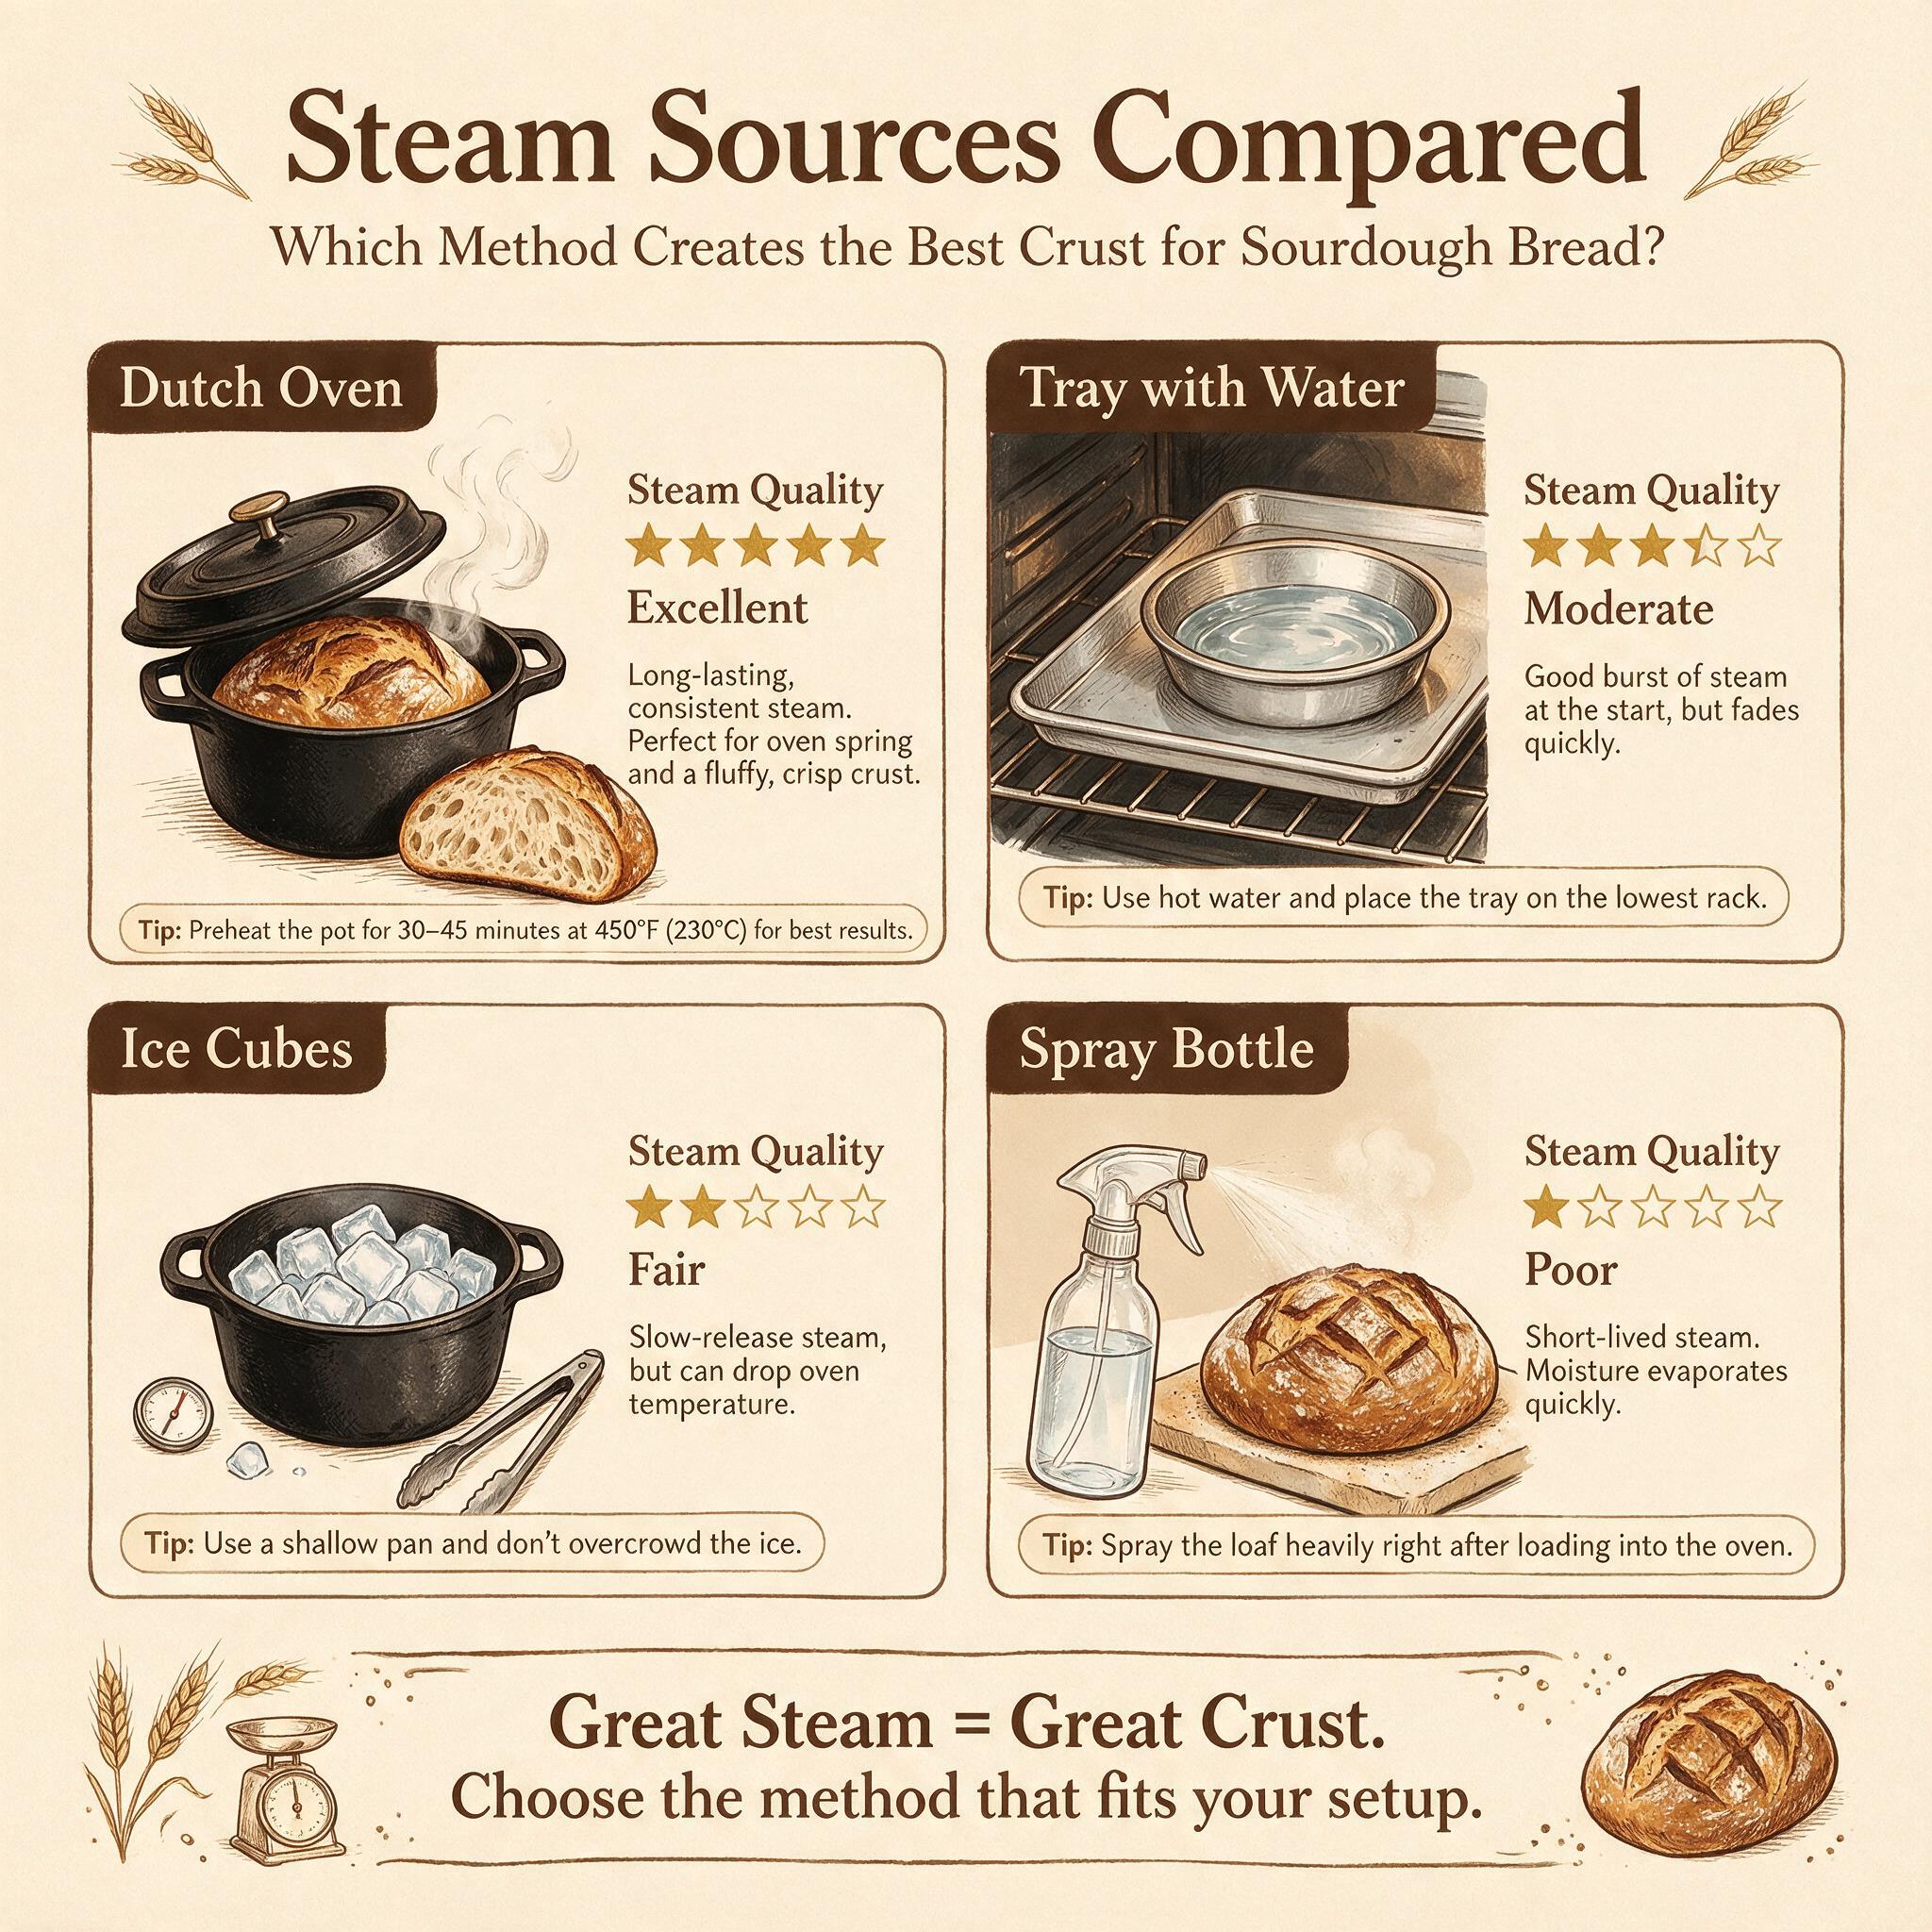
- •Steam is needed for only the first 20 minutes. After oven spring completes, a dry finish allows crust to firm and caramelize. Remove your Dutch oven lid (or stop adding steam) at the 20-minute mark and continue baking uncovered.
- •Dutch oven method (most reliable): Preheat Dutch oven at 500°F/260°C for 45–60 minutes. Bake covered for 20 minutes, then remove lid and finish uncovered at 450°F/230°C. A 5–6 quart pot is ideal for a standard 500g flour loaf — too large disperses steam; too small restricts expansion.
- •Baking steel + bowl method: Preheated baking steel conducts heat 18× faster than ceramic stone and holds significantly more thermal energy than a Dutch oven base. Cover with an upturned metal bowl or roasting pan for steam. This is the preferred method of many serious bakers who bake multiple loaves per session.
- •Cast iron pan + lava rocks: Preheat a cast iron skillet on the oven floor, add boiling water over lava rocks for maximum surface area evaporation. Maurizio Leo's towel method with soaked towels in a separate pan extends steam production through the full 20-minute window.
- •Spray bottle (least effective): Multiple sprays provide minimal moisture; effects are marginal compared to trapped-steam methods. Use as a supplement, not a primary strategy.
Cold Dough Advantage
Putting ice-cold dough directly into a 500°F/260°C oven creates more violent thermal shock than room-temperature dough, causing CO₂ and water vapor to expand more aggressively in those first minutes. This is one of the less-discussed benefits of baking straight from the fridge after cold retard — it literally gives you more oven spring for free.
Factor 3: Scoring Technique and Depth
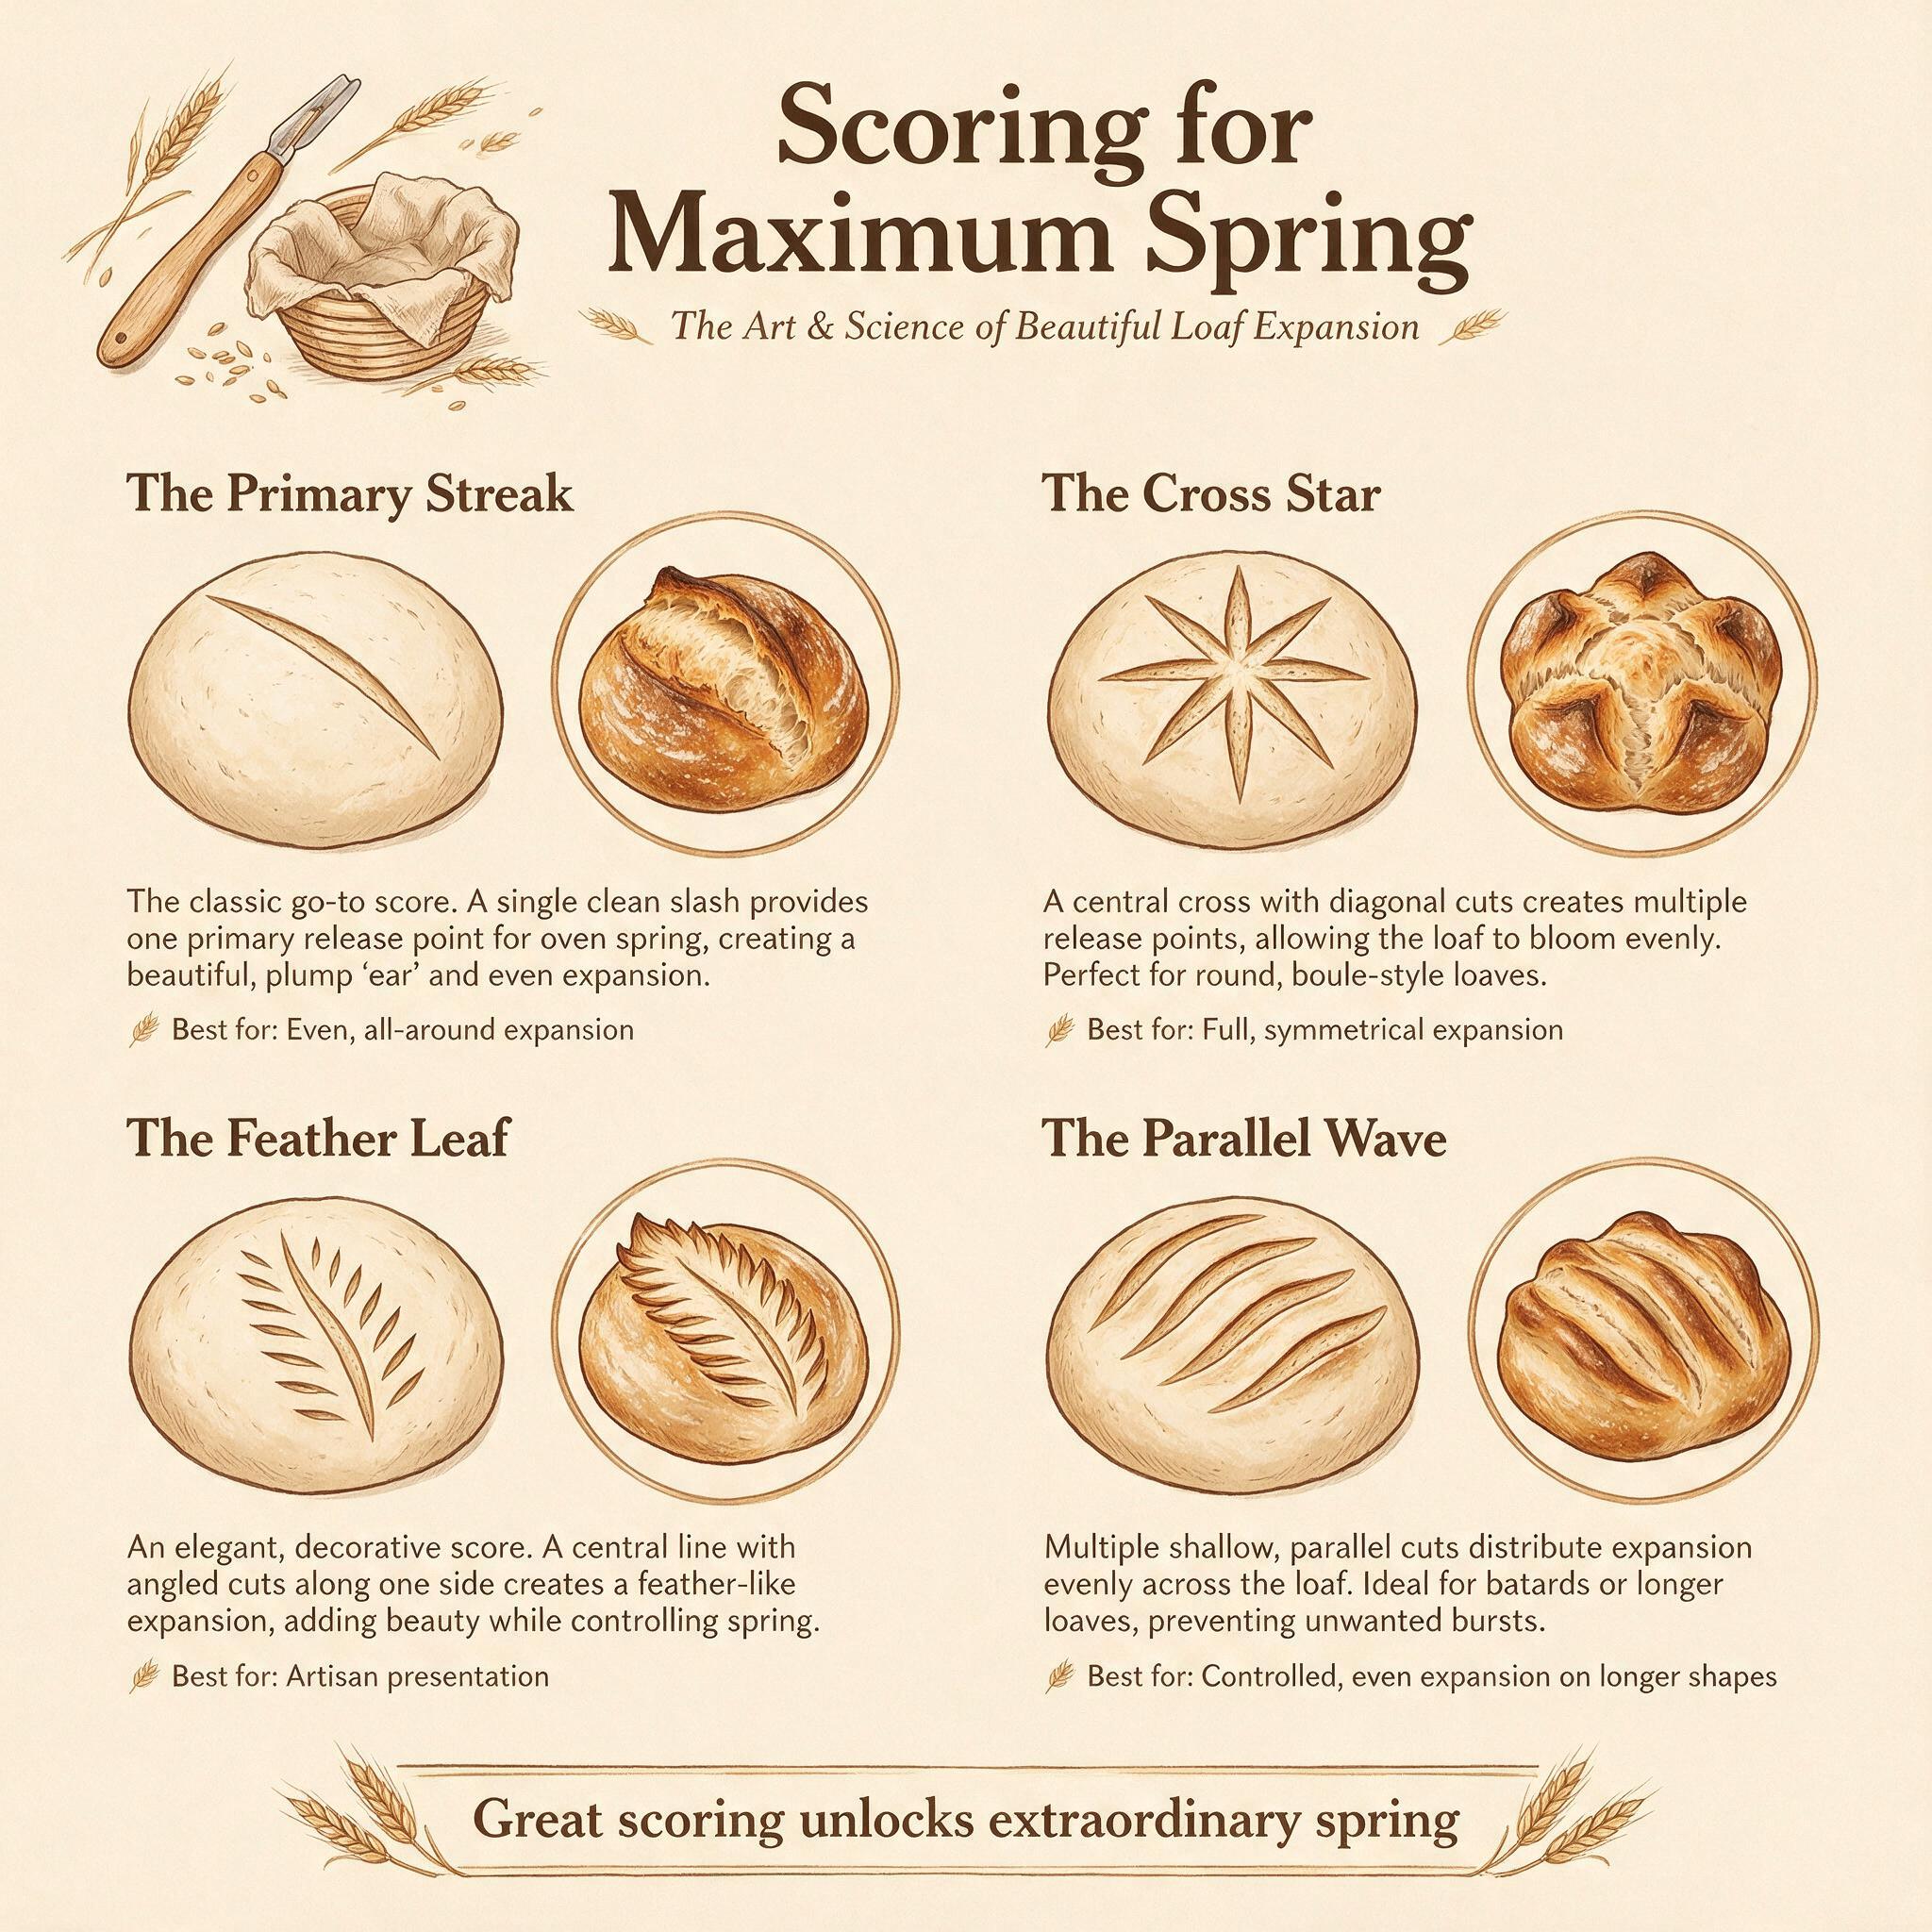
Scoring creates controlled weak points in the dough's surface tension membrane, directing expansion upward through the cut rather than randomly through the sides. Without scoring, the loaf bursts at its weakest structural point — usually the bottom or side — producing an ugly, lopsided result.
The Physics of Scoring
A shallow angled cut creates an asymmetric wound where one side is undercut — this thin flap peels back during expansion to form the "ear." A vertical (90°) cut opens but produces no ear. This has been confirmed by multiple sources including King Arthur Baking, Proofit App, and FLEX Sourdough, all of whom describe the same mechanism with slightly different language.
Best Practices Confirmed by 5+ Sources
- •Angle: 30–45° to dough surface. A shallow angled cut is essential for ear formation. Hold your lame at roughly a 30-degree angle — think "slicing through a layer cake, not stabbing straight down."
- •Depth: ½ inch / 1.3 cm minimum. Score must penetrate through the surface skin into the dough body. Too shallow and the cut seals shut before blooming. Use an aliquot jar to check proofing level first — scoring can't save poorly fermented dough.
- •Blade: Razor-sharp lame (not a dull knife). A dragging blade deflates the dough rather than cutting cleanly. Dust surface lightly with rice flour to reduce drag. Keep blades sharp and swap every 3–4 bakes.
- •Confidence matters: Hesitant, multiple passes produce ragged cuts and gas loss. One confident slash is better than three timid ones. Move decisively — your lame should feel like it's slicing through butter, not sawing wood.
Scoring + Fermentation Relationship
Scoring alone cannot save poorly fermented dough. As SourdoughGeeks notes: scoring is "just the final flourish in a chain of conditions that starts much earlier." A well-fermented, well-shaped loaf scored at 45° will bloom beautifully. An overproofed loaf scored perfectly may still not open because the gluten network has already degraded beyond recovery.
Common Scoring Mistakes
| Symptom | Cause | Fix |
|---|---|---|
| Score barely opened | Too shallow or dull blade | Cut deeper, sharpen lame |
| Side blowout (ragged tear) | Wrong angle OR too shallow | 30–45° angle, ½" depth |
| No ear formed | Vertical score | Use angled cut |
| Dough deflates before baking | Severely overproofed or scoring too early | Bake immediately; cold-proof next time |
Factor 4: Oven Temperature and Preheating
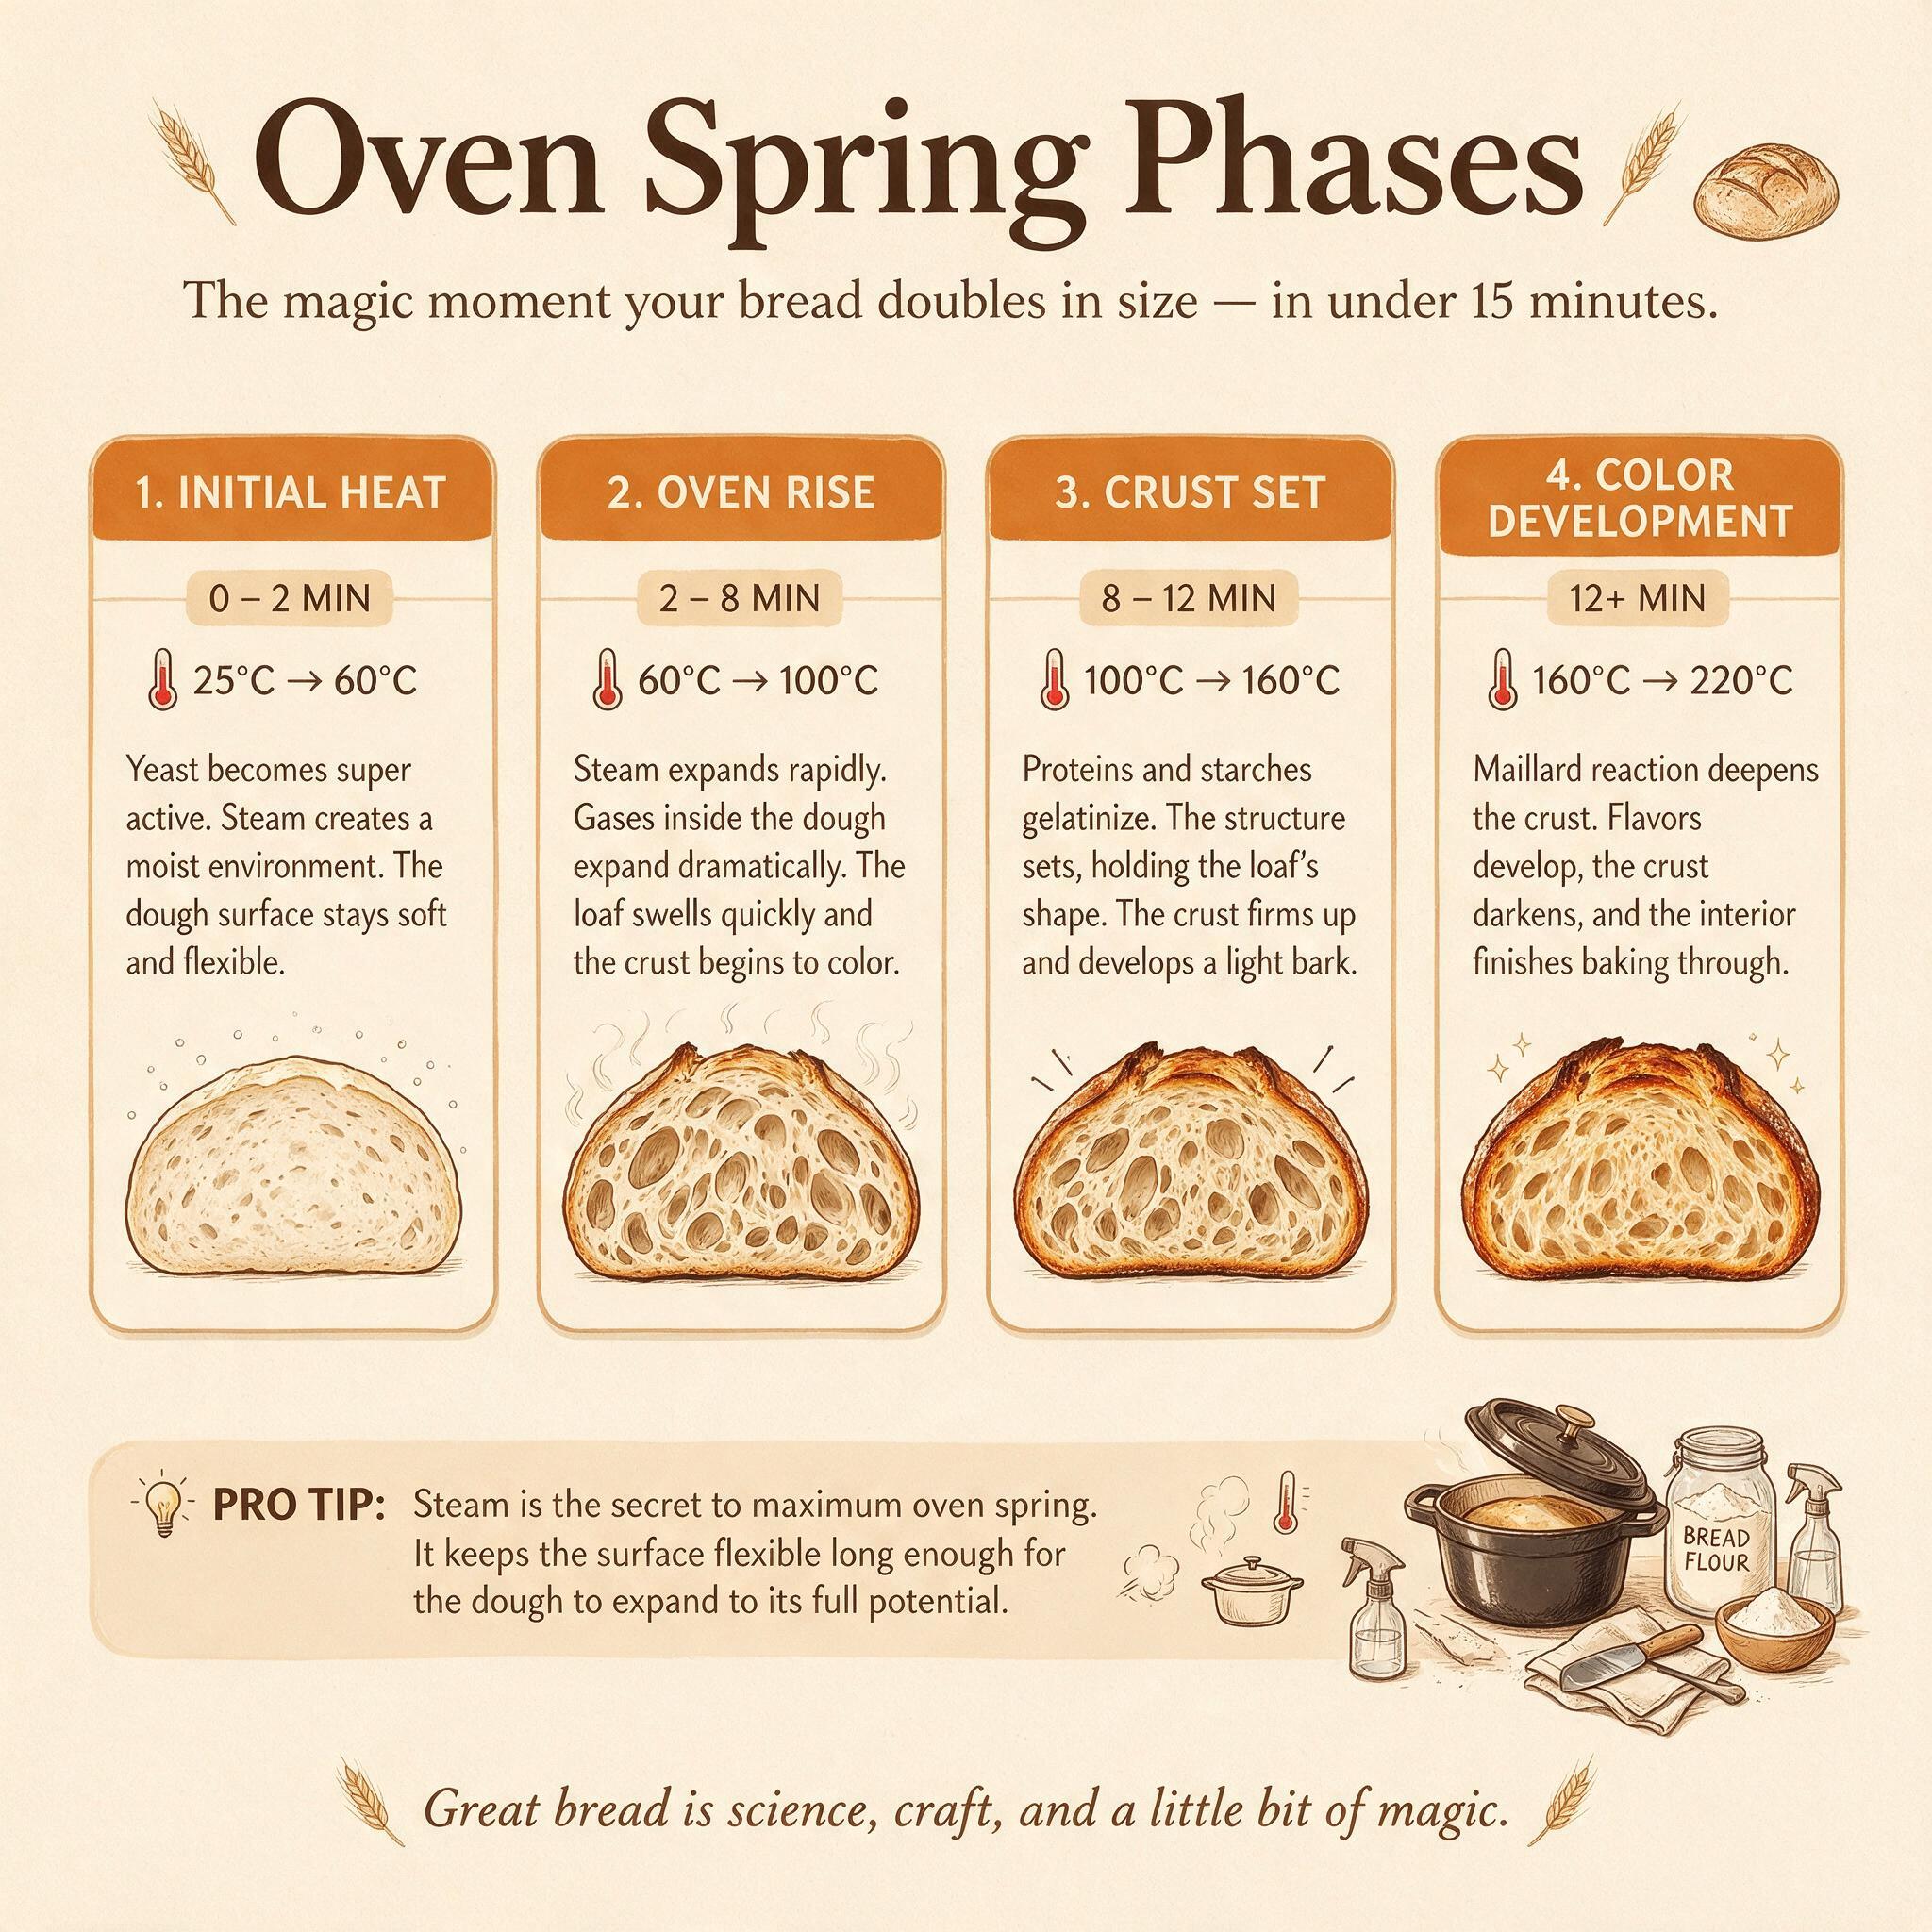
Oven spring is driven by three simultaneous forces when dough hits heat, confirmed by Hoseney/Bloksma calculations published in The Fresh Loaf proceedings:
- Final yeast burst: Yeast produce CO₂ rapidly between 95–140°F/35–60°C before dying. Scientifically, this contributes only ~1% of total oven spring — surprisingly small compared to the thermal forces.
- Thermal gas expansion (~8–10%): Gases already in the dough expand as temperature rises from room temp to 70°C. All sources agree on this contribution.
- Dissolved CO₂ expulsion (~20%): As temperature rises, CO₂ comes out of solution into gas bubbles. This is a major contributor confirmed by both Hoseney and Bloksma models.
- Water vapor (~30–32%): At 70°C, water vapor pressure reaches ~0.3 atm inside gas bubbles, requiring them to expand by factor of 1/(1-0.3) = 1.4×. This is the single largest contributor.
Total potential oven spring: ~60% volume increase. The dough structure determines how much of this capacity is realized. If your gluten network is weak or over-degraded, you won't realize anywhere near that maximum.
Preheating Best Practices
- •Preheat for 45–60 minutes, not just until the oven dial reaches temperature. A Dutch oven may be 100°F/60°C cooler than ambient when the oven first signals ready. That missing thermal mass means less initial steam generation and less driving force for expansion.
- •Use an oven thermometer ($15). Most home ovens run 25–75°F / 14–42°C below their dial setting. Increase set temperature by 25°F to compensate if your oven runs cool. This single $15 tool has eliminated more flat-loaf problems than any other fix I've seen.
- •Rack position: Center or lower-center for maximum bottom heat transfer. Bottom heat is critical for driving upward rise from below — if your loaf sits too high, top heat sets the crust before bottom expansion can occur.
Cold Dough Advantage (Revisited)
Ice-cold dough in a screaming-hot oven = more violent thermal shock. Water vapor pressure builds faster, CO₂ comes out of solution more aggressively, and you get that extra kick of spring in the first five minutes. This is why baking straight from the fridge after cold retard consistently produces better results than same-day bakes.
Temperature Trade-offs
- •500°F/260°C: Maximum oven spring potential during covered phase in Dutch oven.
- •450–475°F/230–245°C: More gentle expansion, fewer large bubbles, thinner tender crust — good finish temperature after removing lid from Dutch oven.
Factor 5: Fermentation Doneness Indicators
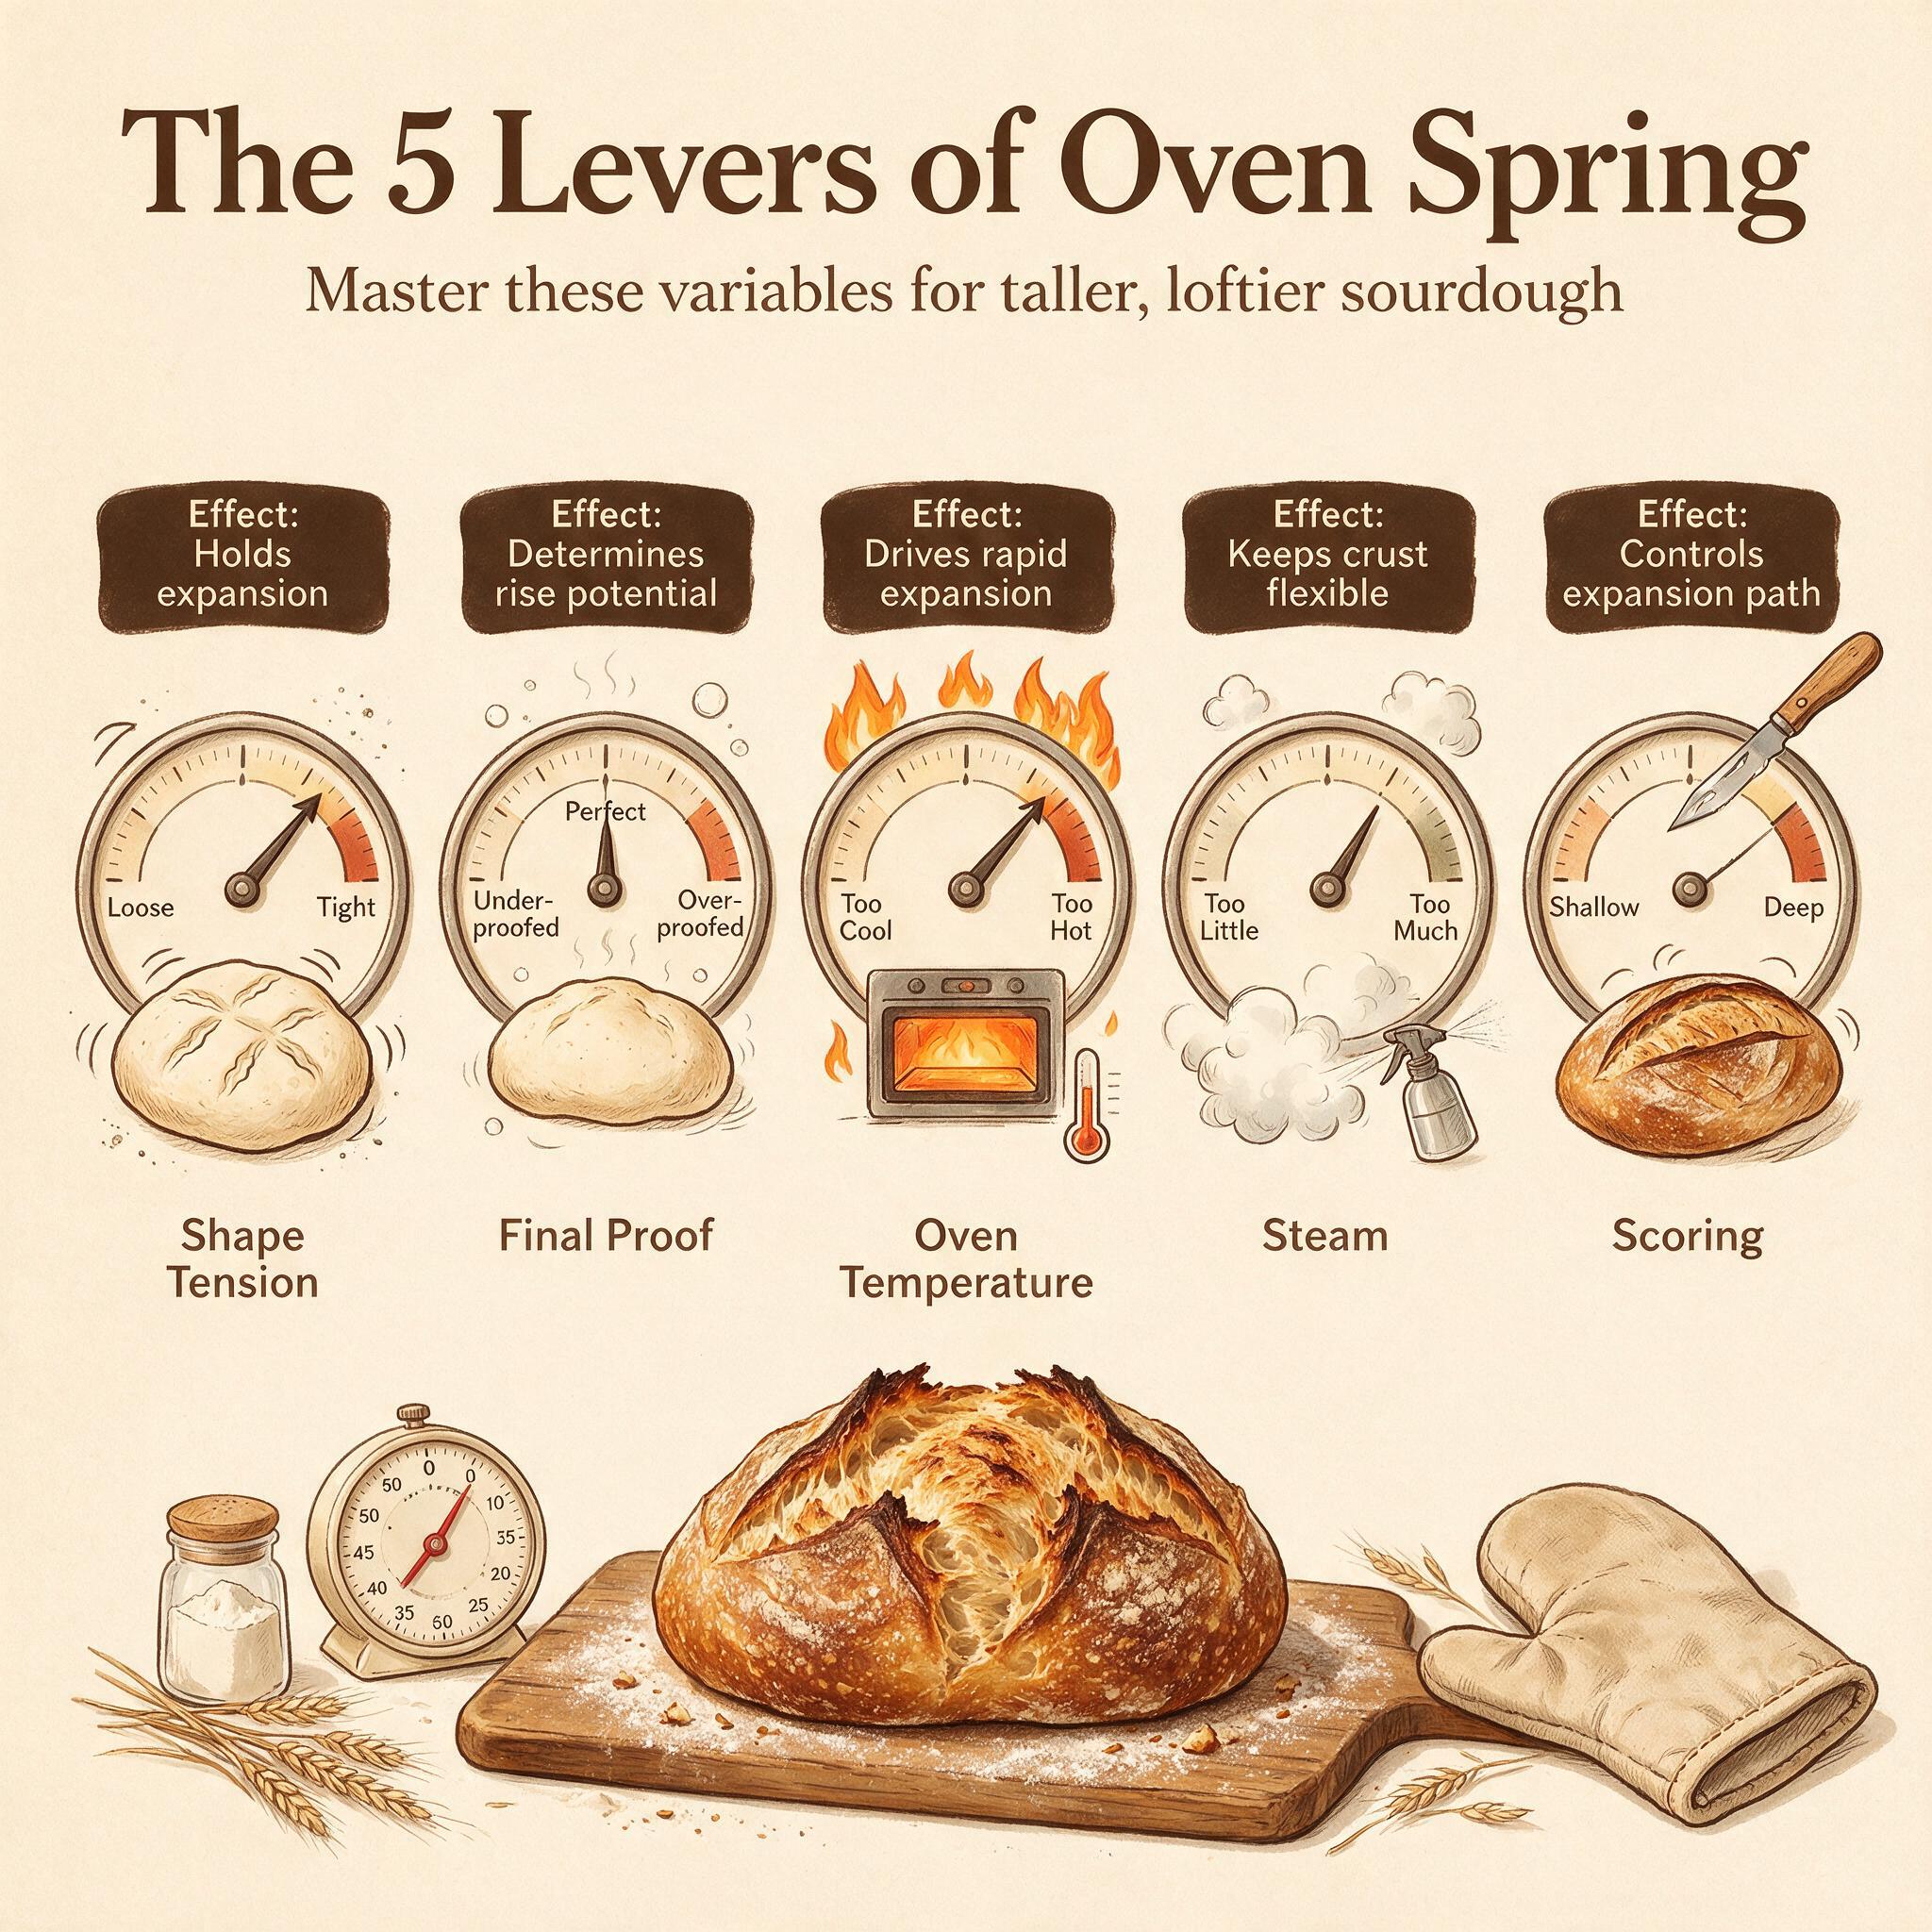
"Properly fermented dough is the single biggest factor impacting oven spring" (The Sourdough Journey). If fermentation timing is wrong, all other factors are secondary. You can have perfect steam, perfect scoring, and a calibrated oven — but if your dough is underproofed or overproofed, oven spring will suffer.
Bulk Fermentation Endpoints
Multiple sources converge on these indicators (SourdoughArchive, Master Crumb, The Pantry Mama):
Aliquot jar targets by dough temperature:
| Dough Temp | Target Rise % | Expected Bulk Time |
|---|---|---|
| 65°F/18°C | 75–100% | 8–12 hours |
| 68°F/20°C | 75% | 6–8 hours |
| 70°F/21°C | 75% | 5–7 hours |
| 72°F/22°C | 60–75% | 4–6 hours |
Visual cues (all should be present together):
- •Dough has risen 30–75% (not doubled — doubling is a myth for sourdough)
- •Surface looks domed and smooth, not flat or sunken
- •Small bubbles visible on sides of container
- •Dough wobbles as one cohesive mass when bowl is shaken
Final Proof Indicators
Poke test: Press floured finger ½" into dough surface. It should spring back slowly and incompletely. If it springs back quickly → underproofed. If indentation stays with no recovery → overproofed.
75–80% of full height is the target for final proof — leave reserve strength for oven spring. This is the golden rule: never fully-proof a loaf if you want maximum oven spring. Save some energy for the oven.
Starter Timing
Use starter when it's "just ripe" — risen noticeably, scattered bubbles, pleasant sour aroma (not overly acidic), loosened consistency. Over-fermented starter brings excess protease enzymes that break down gluten during bulk, weakening your dough before it even hits the oven. Feed starter at 74–78°F/23–25°C for maximum vigor.
Young Starter Effect
If starter is less than four to six weeks old, it may lack microbial density for powerful oven spring even if it passes the float test. Give it another two to four weeks of consistent daily feeding before expecting bakery-level spring. Rebuild with daily feedings at 1:5:5 ratio (starter:water:flour) looking for consistent doubling within four to six hours.
Troubleshooting: Common Flat Results
Every major source agrees on this diagnostic order, from most likely cause to least:
| What You See | Most Likely Cause | Secondary Check |
|---|---|---|
| Loaf flat, spread wide, dense crumb | Overproofed dough | Aliquot jar rise % next bake |
| Loaf spread wide, score opened but no upward rise | Weak shaping / no surface tension | Practice preshaping and final shaping |
| Score cracked roughly, no ear formed | Insufficient steam OR shallow score | Check Dutch oven preheat time and score angle |
| Side blowout (ragged tear) | Score too shallow/wrong angle OR overproofing | Both cause blowouts — check proofing first |
| Some rise but less than expected, pale crust | Oven running cool | Use oven thermometer; extend preheat to 60 min |
| Good spring first 5 min then collapsed | Underproofed — gluten couldn't hold gas | Extend bulk fermentation next bake |
| Great spring but dense gummy crumb | Underbaked — cut too soon | Internal temp should reach 205–210°F/96–99°C |
The Diagnostic Order (Most to Least Likely)
- Check proofing first — use aliquot jar for bulk, poke test for final proof. Overproofing is the #1 cause of flat loaves.
- Check shaping tension — was dough shaped firmly enough to create surface tension?
- Check steam setup — was Dutch oven preheated 45–60 min? Was lid removed at right time?
- Check scoring technique — angle, depth, sharpness of blade.
- Check oven temperature — thermometer reading, rack position, preheat duration.
The "Underproofed Masquerading as Open Crumb" Phenomenon
Maurizio Leo identifies a specific pattern where underproofed dough looks like it has great open crumb and excessive oven spring, but actually has: scattered large holes with strange snaking shapes, dense gummy spots, domed bottom ("U" shape), dull crust, and flat one-dimensional flavor. The fix is more fermentation time, not less. If your bread looks impressive on the outside but tastes underwhelming inside, this is usually why.
Batard vs. Boule: A Note on Shape
Maurizio Leo specifically notes that batards (oval shapes) consistently produce more open interiors than boules. Two reasons: (1) batard shaping is gentler and preserves gas pockets built during bulk; (2) the thinner elongated profile allows oven heat to penetrate faster, promoting more uniform expansion. If you're struggling with oven spring, try switching from boule to batard — it's an easy variable change that often makes a noticeable difference.
Frequently Asked Questions
Does baking steel produce better oven spring than Dutch oven?
Baking steel conducts heat 18× faster than ceramic stone and holds significantly more thermal energy than a Dutch oven base, which can translate to slightly more initial expansion. However, the difference is marginal for most home bakers — a properly preheated Lodge Dutch Oven produces results nearly identical to $300+ purpose-built bread ovens according to Serious Eats testing. The real advantage of steel comes when baking multiple loaves or baguettes where bottom heat matters more than top coverage.
Can scoring alone fix an underproofed loaf?
No. Scoring is "just the final flourish in a chain of conditions that starts much earlier" (SourdoughGeeks). A perfectly scored but poorly fermented loaf will either not open at all or blow out sideways. Score to direct expansion, not to create it. If your dough isn't proofed correctly, scoring won't save it — fix the fermentation first.
Why does my oven spring disappear after 10 minutes?
This usually means one of two things: (1) your dough was slightly underproofed and couldn't sustain the expansion once thermal forces plateaued; or (2) you removed steam too early, causing crust to set before maximum expansion occurred. Try extending covered baking by five more minutes, or check that your bulk fermentation reached at least 60% rise according to aliquot jar tracking.
Closing Thoughts
Oven spring isn't magic — it's physics meeting biology. Thermal expansion pushes gas bubbles apart while water vapor pressure forces them wider, but only if your gluten network is strong enough to hold the expansion and only if you've given the dough enough time to build gas structure during fermentation.
My personal approach: I track bulk with an aliquot jar for every bake (takes ten seconds), I preheat my Dutch oven for a full hour at 500°F, and I score at 30–45° with one confident motion. These three habits alone have given me consistent, reliable oven spring on basically every loaf — not because they're fancy techniques, but because they address the five factors in order of importance: proofing, shaping, steam, scoring, temperature.
The most important thing to remember: fermentation timing matters more than anything else. If you nail proofing (aliquot jar + poke test), everything else becomes much easier to dial in. Start there. Everything else is secondary.
Happy baking!