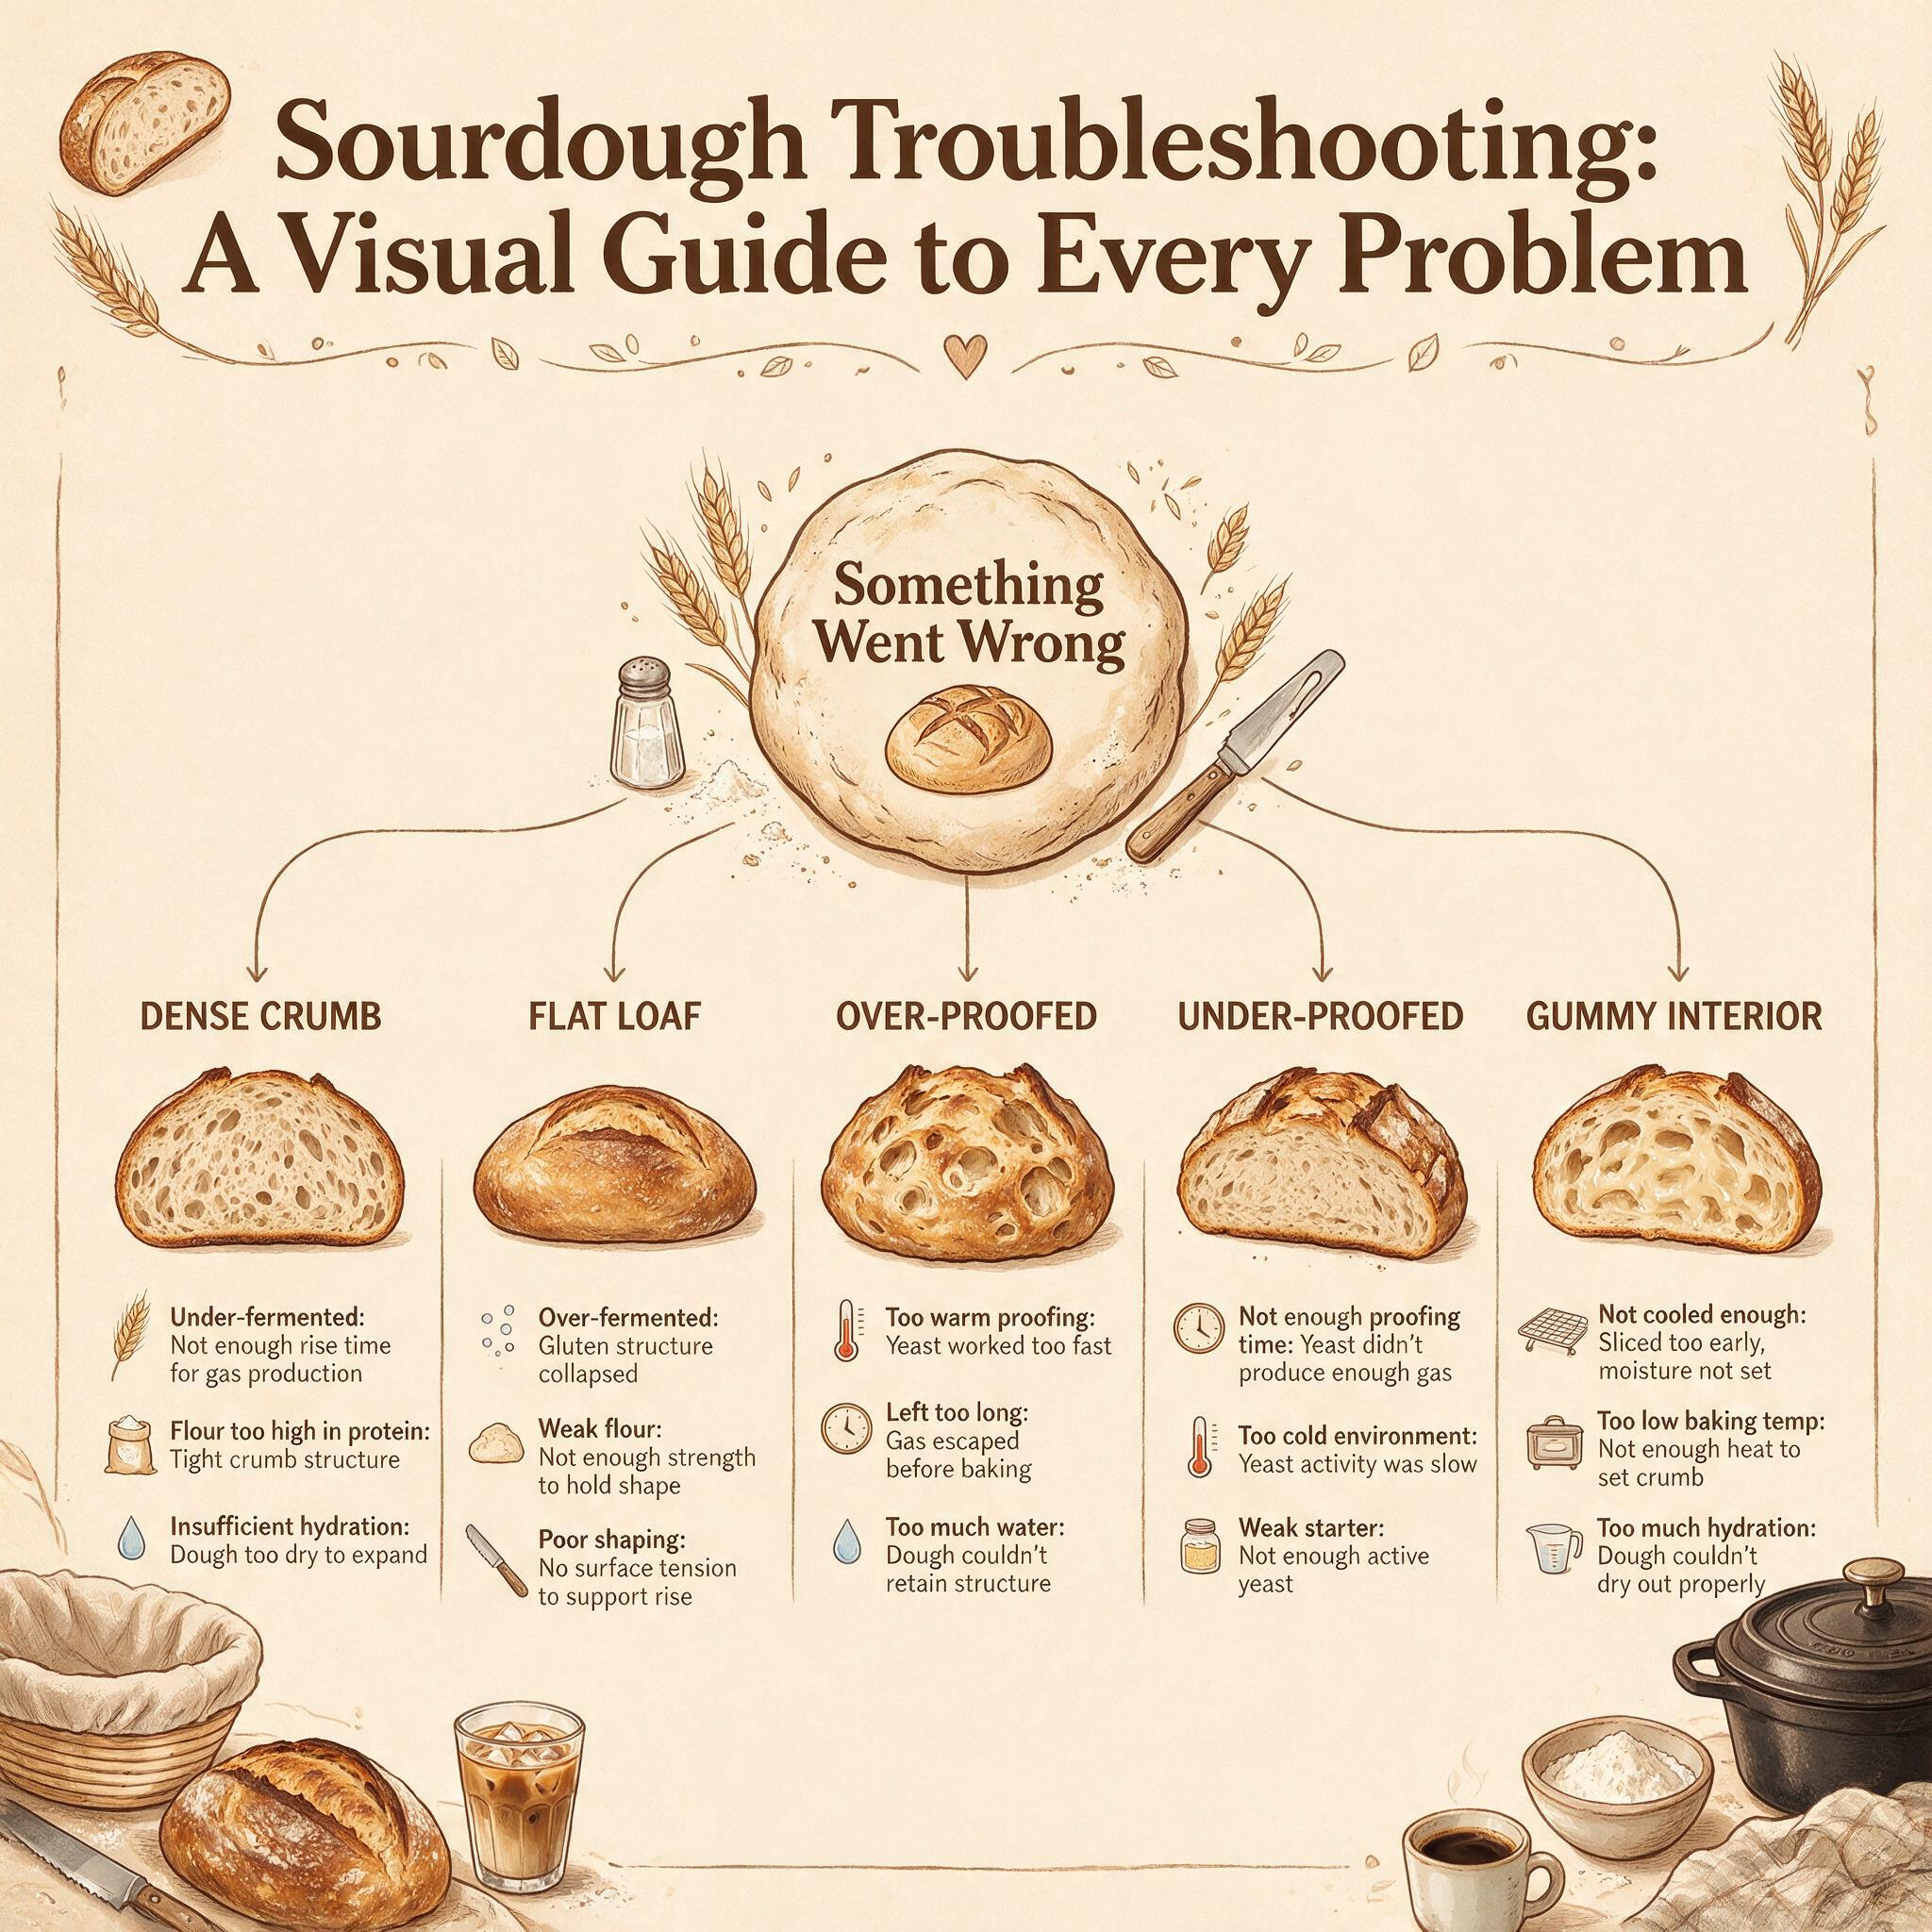
Every sourdough baker has been there. You pull the loaf from the oven, slice into it, and something is... off. Flat. Dense. Gummy. Overly sour. Underwhelming. Your first reaction is always "what did I do wrong?" — but here's the thing: sourdough problems are rarely about doing one thing wrong. They're usually about a chain of small decisions that led somewhere unexpected.
The good news? Almost every problem you'll encounter has a clear root cause, and almost every root cause has an actionable fix on your next bake. You just need to know where to start looking.
This guide is organized by symptom — what you see in the finished loaf — tracing back to root causes with practical fixes. Think of it as something you bookmark and come back to when things go sideways (because they will, for everyone).
What You'll Learn
By the end of this post, you'll be able to diagnose:
- •Flat bread that spread wide instead of rising up
- •Gummy crumb that sticks to your teeth
- •Dense, heavy loaves with no oven spring
- •Bread that barely rose at all
- •Loaves that are too sour (or not sour enough)
- •Crust problems: too thick, too thin, pale, or burnt
Each symptom traces back to a few likely causes. You'll get actionable fixes you can apply on your next bake — no guesswork required. Let's walk through them.
The Diagnostic Order: Where to Start Looking
Every major source agrees on this troubleshooting sequence (from SourdoughArchive, Summit Sourdough, and others):
- Check proofing first — use an aliquot jar for bulk tracking, poke test for final proof. Overproofing is the #1 cause of flat loaves.
- Check shaping tension — was dough shaped firmly enough to create surface tension?
- Check steam setup — was Dutch oven preheated 45–60 minutes? Was lid removed at right time?
- Check scoring technique — angle, depth, sharpness of blade.
- Check oven temperature — thermometer reading, rack position, preheat duration.
Start at #1 and work down only if the fix doesn't resolve it. Most problems are solved at step one or two.
Problem 1: Flat Bread That Spread Wide
What You See
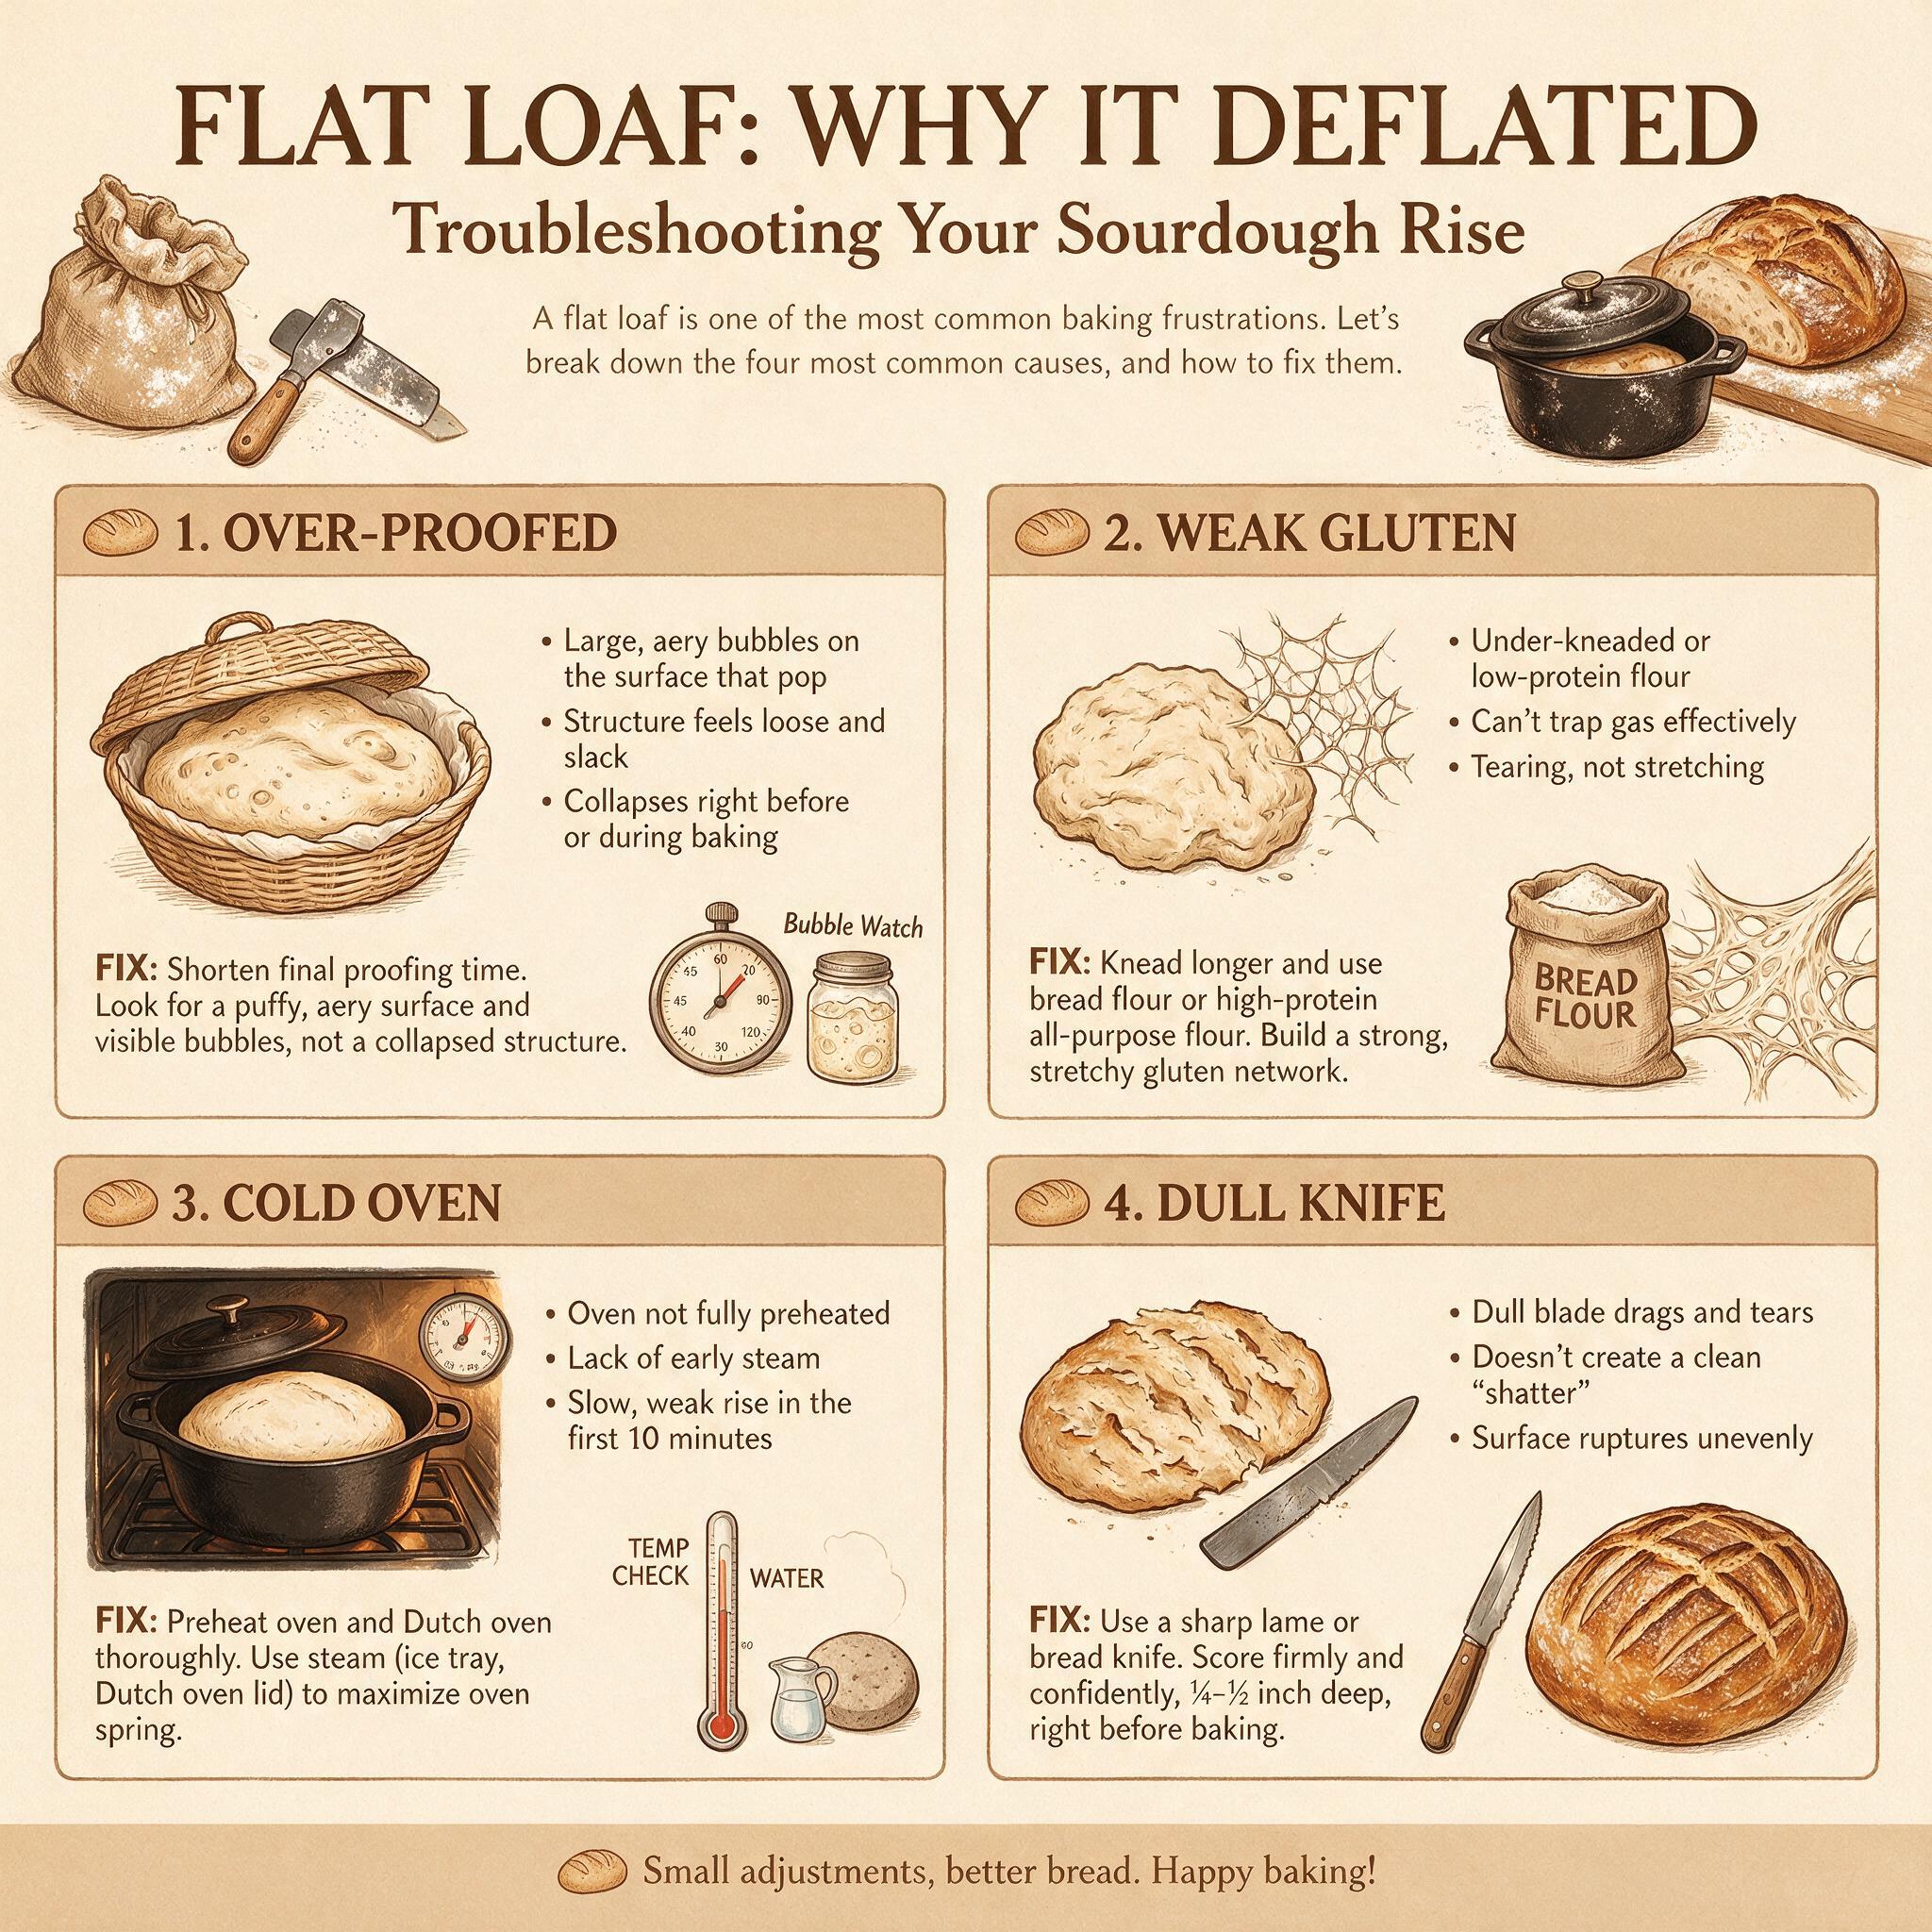
The loaf spread sideways in the oven instead of rising upward. It looks like a pancake with a crust. The crumb is dense and tight, sometimes with large irregular holes near the bottom but compressed at the top.
Most Likely Cause: Overproofed Dough (80% of cases)
When dough ferments too long, protease enzymes break down gluten strands until the structure can no longer hold gas. The dough has maximum acidity, minimum strength, and collapses under its own weight when hit with oven heat.
How to confirm:
- •Did your aliquot jar show more than 100% rise at the end of bulk? (Doubling is a myth — most artisan sourdough should rise 60–75%)
- •Did the poke test show complete sink-in with no recovery?
- •Was your cold retard longer than intended (24+ hours)?
Fix on next bake: Shorten bulk fermentation. Use an aliquot jar to track actual rise percentage instead of relying on time estimates. Target 60–75% rise at your kitchen temperature, not "doubled." For final proof, aim for 75–80% of full height — leave reserve strength for oven spring.
Secondary Cause: Weak Shaping / No Surface Tension (15% of cases)
If the dough has no surface tension from shaping, it will spread in every direction when it hits heat. This is different from overproofing — your dough might be perfectly proofed but shaped too loosely.
How to confirm:
- •Did the loaf have decent oven spring at first (it rose), then collapse? That's weak shaping.
- •Was preshape followed by a proper bench rest before final shaping?
- •Did you shape firmly enough to create visible surface tension?
Fix on next bake: Preshape, give 20 minutes bench rest, then final shape with firm tension. Pull the dough surface tight like you're closing a purse — the seam should be visible and taut when turned over. If it doesn't hold its shape during the banneton proof, it will spread in the oven.
Rare Cause: Underproofed Dough (5% of cases)
Yes, underproofed dough can also look flat — but it usually has a different crumb pattern. An underproofed loaf that spreads typically shows scattered large holes with strange snaking shapes and dense gummy spots. The fix is more fermentation time, not less.
Fix on next bake: Extend bulk fermentation by 30–60 minutes. Use the aliquot jar method to track actual rise percentage rather than relying on a timer.
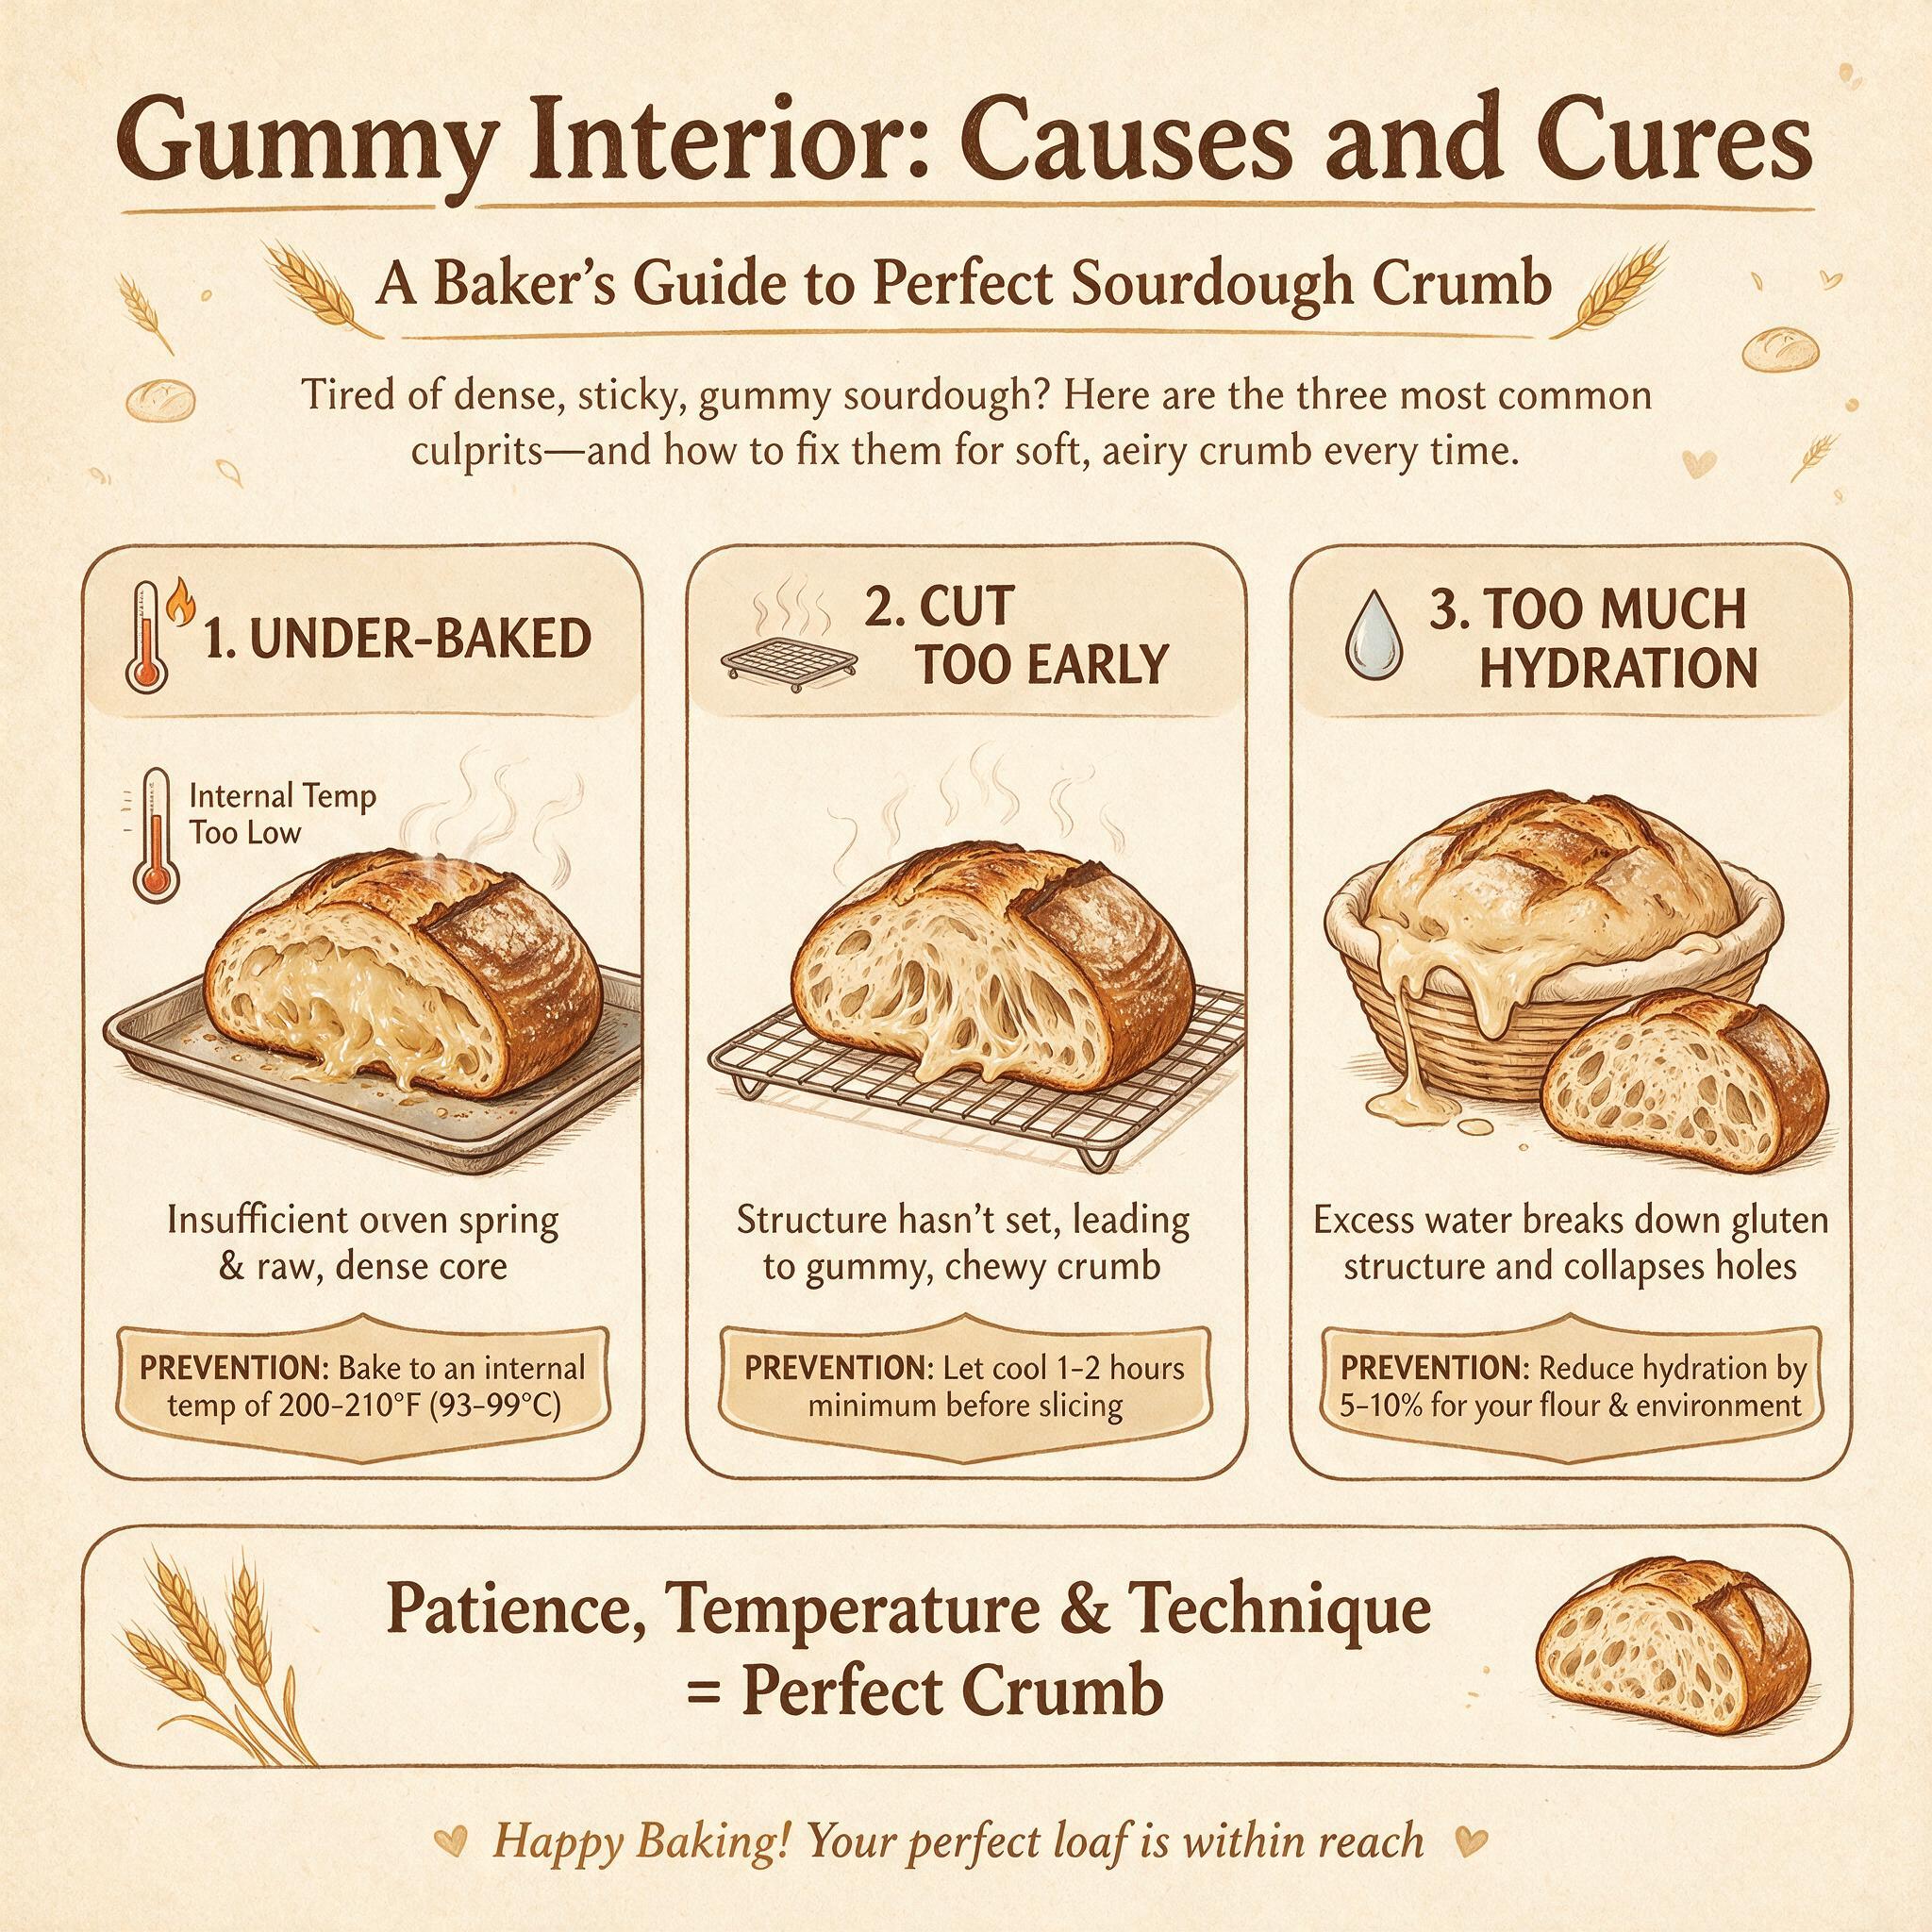
Problem 2: Gummy Crumb That Sticks to Your Teeth
What You See
The interior of your loaf feels wet, sticky, and dense — like dough that never fully cooked through. The crust might look fine (golden brown), but the inside is gummy and doesn't flake apart when you pull it.
Most Likely Cause: Underbaked Bread
"Golden brown" is not a reliable doneness indicator — some crusts brown before the interior is cooked. Gummy crumb almost always means the bread came out of the oven too early, before starches fully gelatinized.
How to confirm: Did you use an instant-read thermometer? Internal temperature should reach 205–210°F (96–99°C). If you pulled it at 195°F, that's your problem. Dense whole wheat doughs sometimes need the higher end of that range because they're denser and conduct heat more slowly.
Fix on next bake: Bake until internal temperature reaches 205–210°F. Don't judge by crust color alone. If you don't have a thermometer, knock on the bottom — it should sound hollow. But a $12 instant-read thermometer is worth every penny for sourdough bakers.
Secondary Cause: Overproofed High-Hydration Dough
Overproofed dough at high hydration can also produce gummy crumb because the gluten network has degraded so much that gas cells collapse and trap moisture in dense pockets. The difference from underbaking: an overproofed loaf usually feels heavy and gummy, while an underbaked loaf might be firm but still gummy inside.
Fix on next bake: Shorten bulk fermentation by 30–60 minutes. Use the aliquot jar method to track rise percentage. At higher hydrations (75%+), the perfect-proof window is narrower — what's perfect at hour four may be overproofed by hour five.
Whole Wheat Specific: Need Higher Internal Temperature
Whole wheat doughs are denser and need slightly higher core temperatures to fully gelatinize starches. If you're baking 100% WW, aim for the upper end of the range — 208–210°F. Underbaked whole wheat is notoriously gummy because the bran particles absorb moisture that doesn't fully cook out at lower temperatures.
Problem 3: Dense, Heavy Loaves With No Oven Spring
What You See
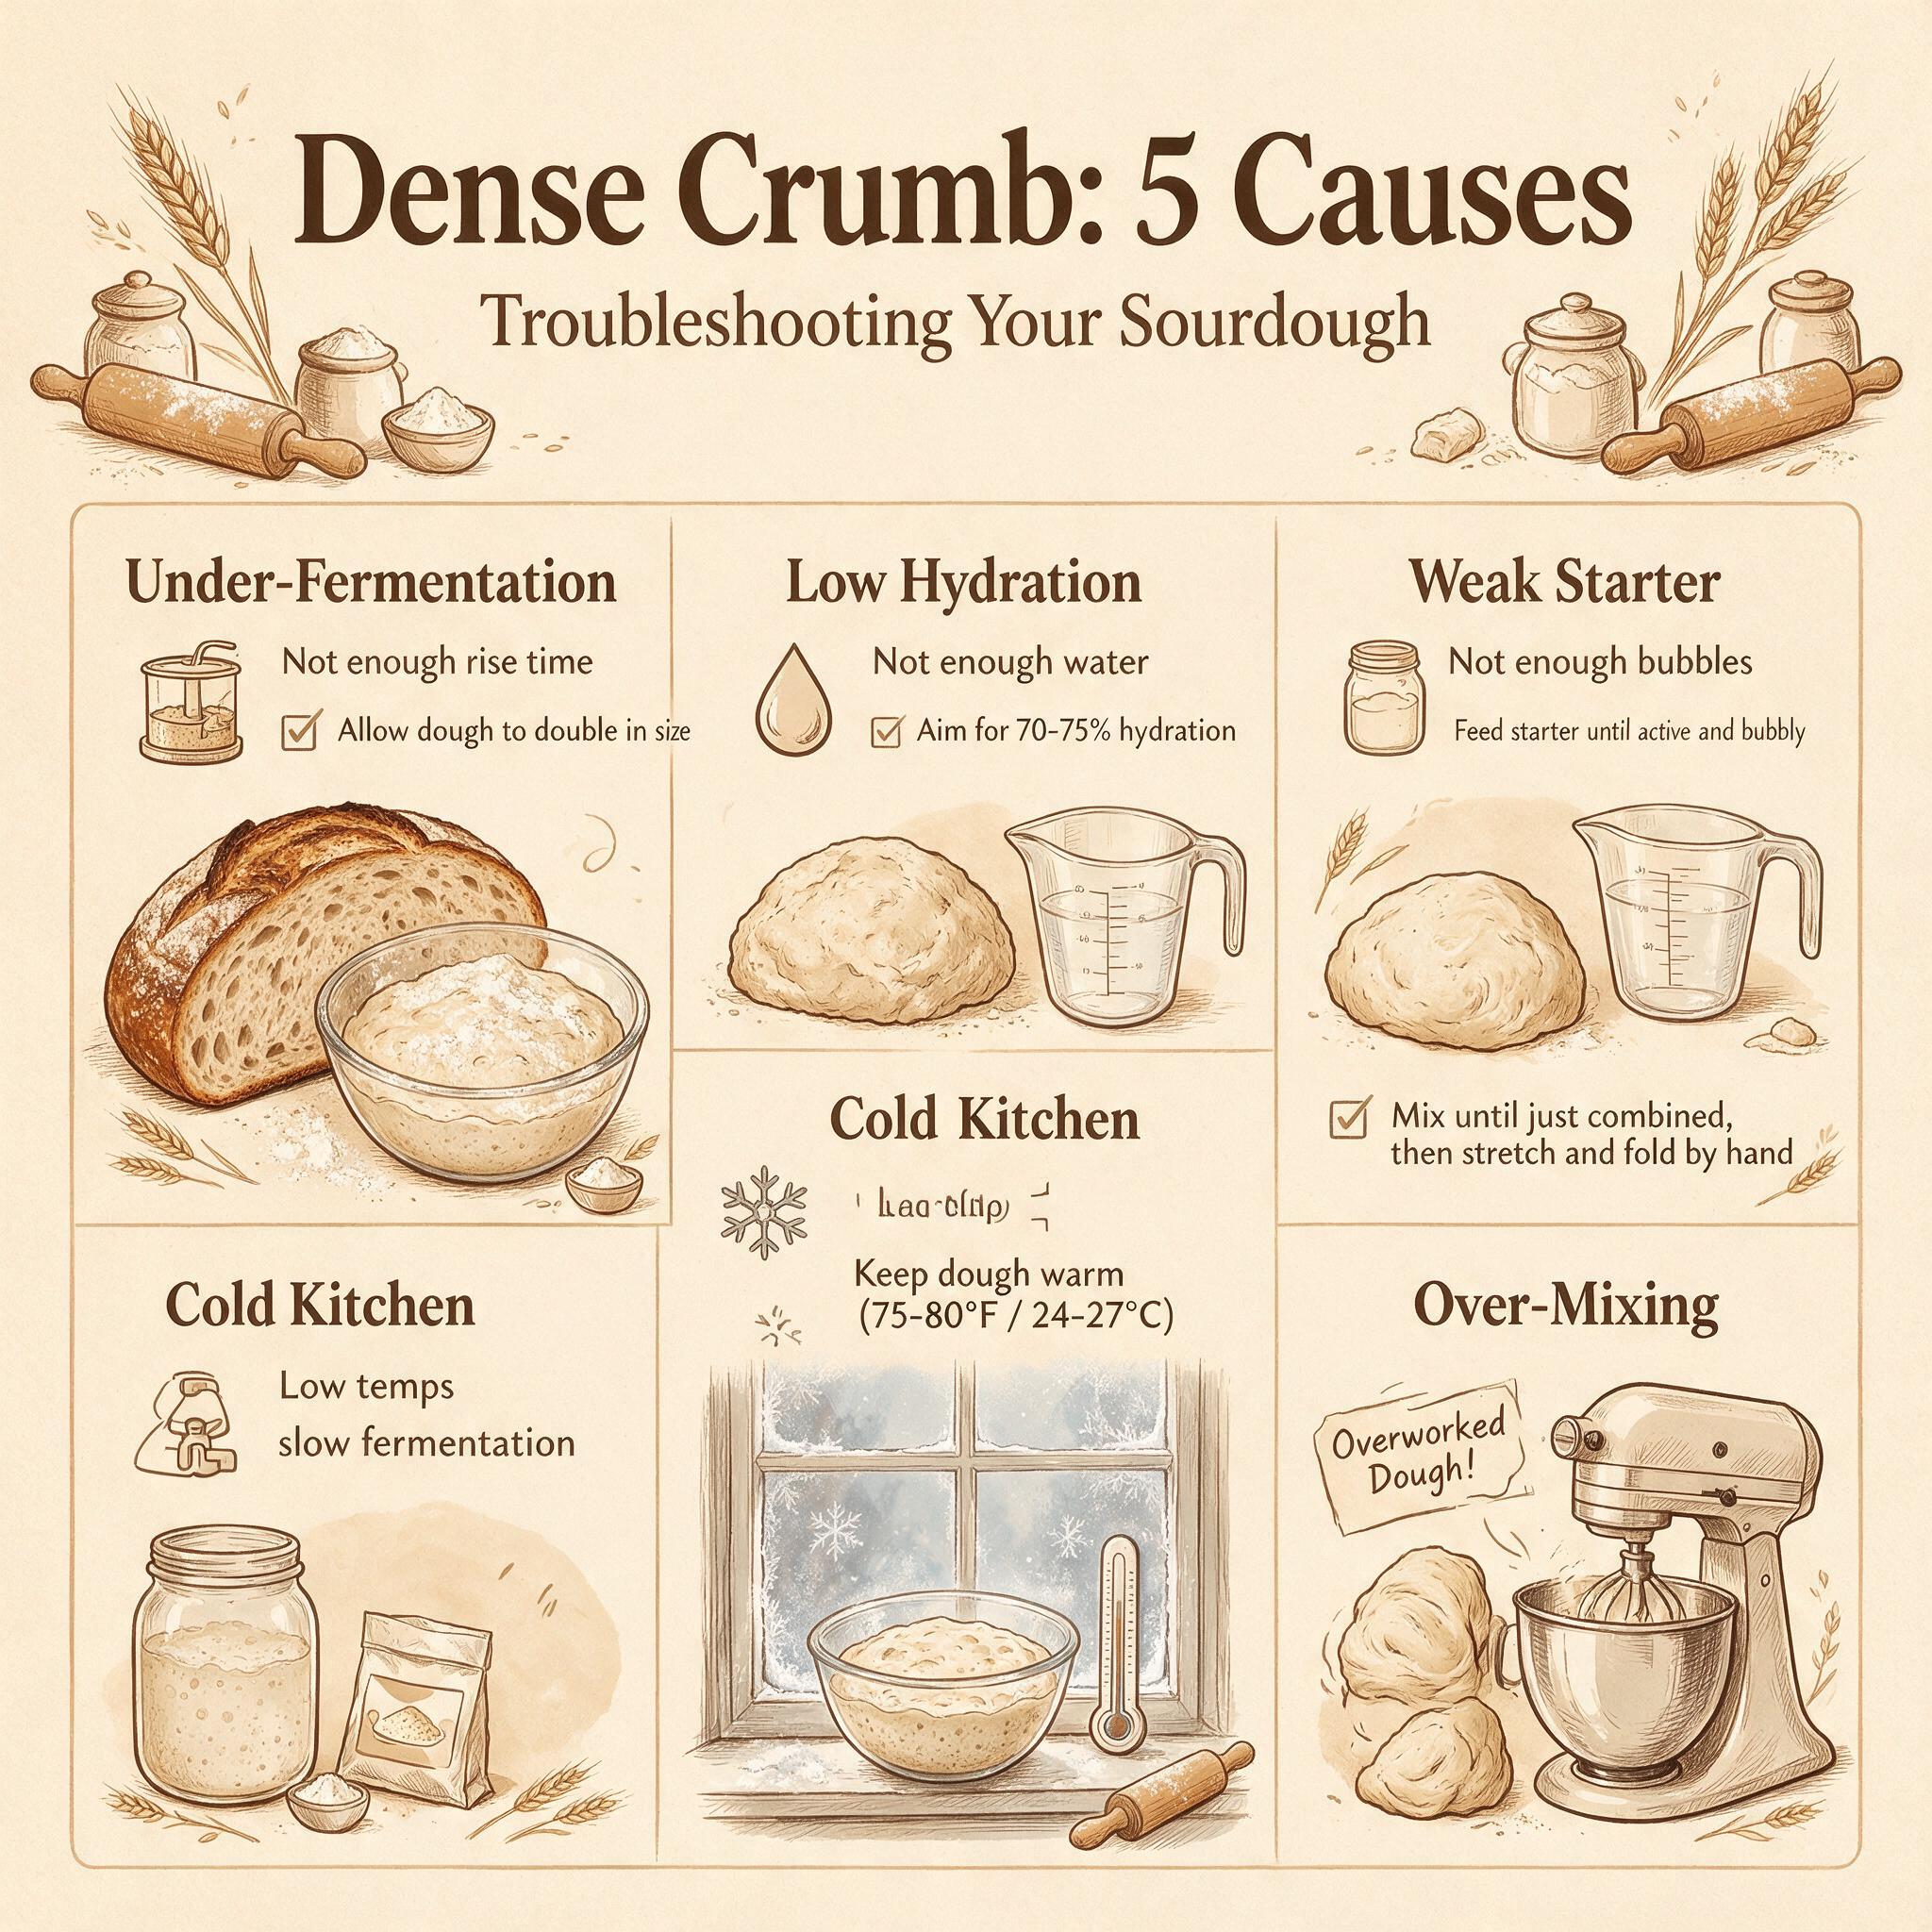
The loaf is compact and heavy. The crumb has small holes or is nearly solid. It slices but feels like a brick compared to what you expected. Very little expansion in the oven — maybe one or two centimeters of rise at most.
Most Likely Cause: Underproofed Dough
This is counterintuitive — you'd think underproofed dough would be too tight to expand, but dense/underproofed and flat/overproofed are actually opposite problems that both produce heavy loaves. An underproofed loaf hasn't built enough gas structure during fermentation, so there's nothing for the oven spring to push against.
How to confirm:
- •Aliquot jar showed less than 30–40% rise at end of bulk?
- •Poke test showed quick spring-back with no indentation staying?
- •Bulk fermentation was shorter than your typical successful bake?
Fix on next bake: Extend bulk fermentation by 1–2 hours. Use an aliquot jar (a clear container where you can see the dough's actual rise) to track percentage increase rather than relying on time estimates. At your kitchen temperature, most loaves need 60–75% rise at the end of bulk — not doubled, not "when it looks done."
Secondary Cause: Dead or Weak Starter
If your starter wasn't active enough when you used it, fermentation moves slowly and dough never builds proper gas structure. A young starter (less than four to six weeks old) may lack microbial density for powerful oven spring even if it passes the float test.
How to confirm:
- •Did your starter double in volume within 4–6 hours after feeding?
- •Was your starter less than a month old?
- •Did you feed your starter at room temperature (not fridge-cold) before baking?
Fix on next bake: Rebuild with daily feedings at a 1:5:5 ratio (starter:water:flour) looking for consistent doubling within four to six hours. If your starter is young, give it another two to four weeks of consistent daily feeding. Always use starter when it's "just ripe" — risen noticeably, full of bubbles, pleasant sour aroma, loosened consistency.
Third Cause: Wrong Flour Ratio
Low-protein flour (all-purpose at 10–11%) can't support the same gas structure as bread flour (12–13% protein). If your recipe calls for high hydration but you used AP flour, the dough will be dense regardless of proofing.
Fix on next bake: Match hydration to your flour's protein content. For all-purpose flour, target 64–66% hydration maximum. For bread flour, 70–78% is achievable with practice. If using whole wheat, remember that bran cuts gluten strands — even WW at "13–14% protein" has lower functional gluten than white bread flour.
Problem 4: Bread That Barely Rose at All (The "Flat Disc")
What You See
Your loaf expanded maybe one centimeter in the oven. It looks like a thick disc with no height. The crust might be decent, but the interior is dense throughout — not just at the bottom or top, but everywhere.
Most Likely Cause: Starter Was Dead or Very Young
If your starter wasn't alive enough to produce gas during fermentation, nothing else matters. No amount of perfect shaping, steam, or scoring will create oven spring from dough that has no gas structure built up during bulk.
How to confirm:
- •Did the starter double in volume within 4–6 hours at room temperature after feeding?
- •Was there visible activity (bubbles, volume increase) before you mixed your dough?
- •If using a fridge starter, was it fed and activated for at least two feedings before baking?
Fix on next bake: Feed your starter daily at room temperature until it reliably doubles within four to six hours. A young starter (under 4–6 weeks) may need another two to four weeks of consistent feeding before achieving bakery-level gas production. Rebuild ratio: 1 part starter : 5 parts water : 5 parts flour, fed every 12 hours.
Secondary Cause: Dough Was Shaped Too Loosely
If shaping created almost no surface tension, the dough will spread flat in all directions with minimal upward rise. This is especially common when bakers are afraid of "deflating" their dough and shape it too gently.
Fix on next bake: Preshape → 20-minute bench rest → final shape with firm tension. The dough should hold its shape when turned out of the banneton. If it sags immediately, shape tighter on the next bake.
Third Cause: Over-Extended Bulk Fermentation
If bulk fermentation ran way too long (especially at warm temperatures), protease enzymes degraded gluten to the point where the structure couldn't support any expansion. This is extreme overproofing — more severe than Problem 1 above.
How to confirm: Aliquot jar showed more than 100% rise; dough was sunken and deflated before shaping; strong vinegar aroma from acetic acid buildup.
Fix on next bake: Shorten bulk by 30–60%. Use aliquot jar tracking. At warmer kitchen temperatures (above 78°F / 26°C), fermentation moves much faster than at cooler temps — adjust your timeline accordingly.
Problem 5: Loaves That Are Too Sour (Or Not Sour Enough)
What You See
Your bread tastes aggressively tangy, vinegary, or sharp — more sour than you enjoy. Or conversely, it's almost sweet with barely any sourdough character.
For Excessive Sourness
Most likely cause: Long cold retard combined with cool bulk fermentation. Acetic acid production increases dramatically during extended cold proofing (24+ hours). Cooler temperatures favor acetic-producing bacteria over lactic producers.
Fix on next bake: Shorten cold retard to 12–16 hours for milder bread. Ferment bulk at warmer temperatures (78–80°F / 26–27°C) to favor lactic acid production. Use starter closer to peak activity rather than letting it get hungry.
Secondary cause: Starter was very hungry when used. A starter that's been neglected for two or more days shifts toward acetic-producing bacteria.
Fix: Feed starter daily and use at peak (just after doubling), not past peak when hooch has formed.
For Insufficient Sourness
Most likely cause: Short bulk fermentation at warm temperatures. Lactic acid bacteria dominate in warm, fast fermentations, but if the ferment is too short, total acid accumulation stays low.
Fix on next bake: Extend cold retard to 16–24 hours minimum. Try a cooler bulk ferment (68–70°F / 20–21°C) if possible. Let your starter develop some hooch before using it — that signals acetic-producing bacteria have had time to establish. If your kitchen runs warm, ferment in the coolest spot you can find (basement, bathroom with no heat).
Problem 6: Crust Problems — Too Thick, Too Thin, Pale, or Burnt
Thick / Leathery Crust
Cause: Insufficient steam during first 20 minutes of baking. Without steam, the crust sets within the first three to five minutes, preventing oven spring and producing a thick, leathery texture instead of thin and crackly.
Fix: Use a Dutch oven (preheated 45–60 minutes), or the tray-with-ice method with a cast iron skillet on the rack below your dough. Steam is needed only for the first 20 minutes — then remove it to allow crust to firm and caramelize.
Pale / Underdeveloped Crust
Cause: Oven running cooler than dial indicates (most home ovens run 25–75°F below setting), or insufficient preheating time (need 45–60 minutes, not just until the oven signals ready). Dutch ovens may be 100°F cooler than ambient when the oven first signals ready.
Fix: Use an oven thermometer ($15) and increase set temperature by 25°F if your oven runs cool. Preheat for at least 45 minutes, preferably 60. For Dutch oven baking: preheat pot + lid together for a full hour at 500°F.
Burnt / Dark Crust
Cause: Oven too hot (dial reads higher than actual temperature), or loaf placed on the wrong rack position. Bottom heat is critical — if your loaf sits too close to the heating element, the crust will char before the interior cooks through.
Fix: Move rack to center or lower-center position for balanced heat distribution. Use an oven thermometer to verify actual temperature. If using a Dutch oven, reduce temperature by 25°F from dial setting as compensation.
Problem 7: Score Barely Opened (No Ear)
What You See
The scored area barely opened — maybe a millimeter or two of expansion. No ear formed. The loaf looks like it was scored but nothing happened.
Most likely cause: Score too shallow or blade was dull. Scoring must penetrate through the surface skin into the dough body — at least ½ inch (1.3 cm) deep. A dull blade drags and deflates rather than cutting cleanly.
Fix: Use a razor-sharp lame (not a dull knife). Cut at a 30–45° angle to the dough surface — this creates an asymmetric wound where one side is undercut, forming the ear during expansion. Score with one confident motion; hesitant multiple passes produce ragged cuts and gas loss.
Secondary cause: No steam in oven. Scoring won't bloom properly without adequate steam (covered above).
Problem 8: Side Blowout (Ragged Tear on the Side)
What You See
Instead of a clean opening at the scored area, the loaf burst open along its side with an irregular tear. The crumb near the blowout is often dense and underdeveloped.
Most likely cause: Score too shallow OR wrong angle — combined with overproofing. Both issues create weak points on the sides that give way before the score opens.
Fix: Cut deeper (½ inch minimum) at a 30–45° angle. Check proofing level — side blowout is frequently a sign of overproofed dough where gluten has degraded and any weak point gives way first.
The Troubleshooting Matrix: Quick Reference
Here's a consolidated view organized by the most common symptoms:
| Symptom | Most Likely Cause | Quick Fix for Next Bake |
|---|---|---|
| Flat, spread wide | Overproofed dough | Use aliquot jar; target 60–75% rise |
| Gummy crumb | Underbaked bread | Bake to 205–210°F internal temp |
| Dense, no spring | Underproofed or dead starter | Extend bulk; verify starter activity |
| Barely rose (flat disc) | Dead/young starter | Daily feedings until reliable doubling |
| Too sour | Long cold proof + cool ferment | Shorten cold proof to 12–16h; warm bulk |
| Not sour enough | Short warm ferment | Extend cold proof; cooler bulk ferment |
| Score didn't open | Shallow score / dull blade | Cut deeper at 30–45° angle with sharp lame |
| Side blowout | Overproofed + shallow score | Proof less; cut deeper and angled |
| Thick crust | Insufficient steam | Dutch oven preheated 45–60 min |
| Pale crust | Oven runs cool / short preheat | Use oven thermometer; extend preheat to 60 min |
Frequently Asked Questions
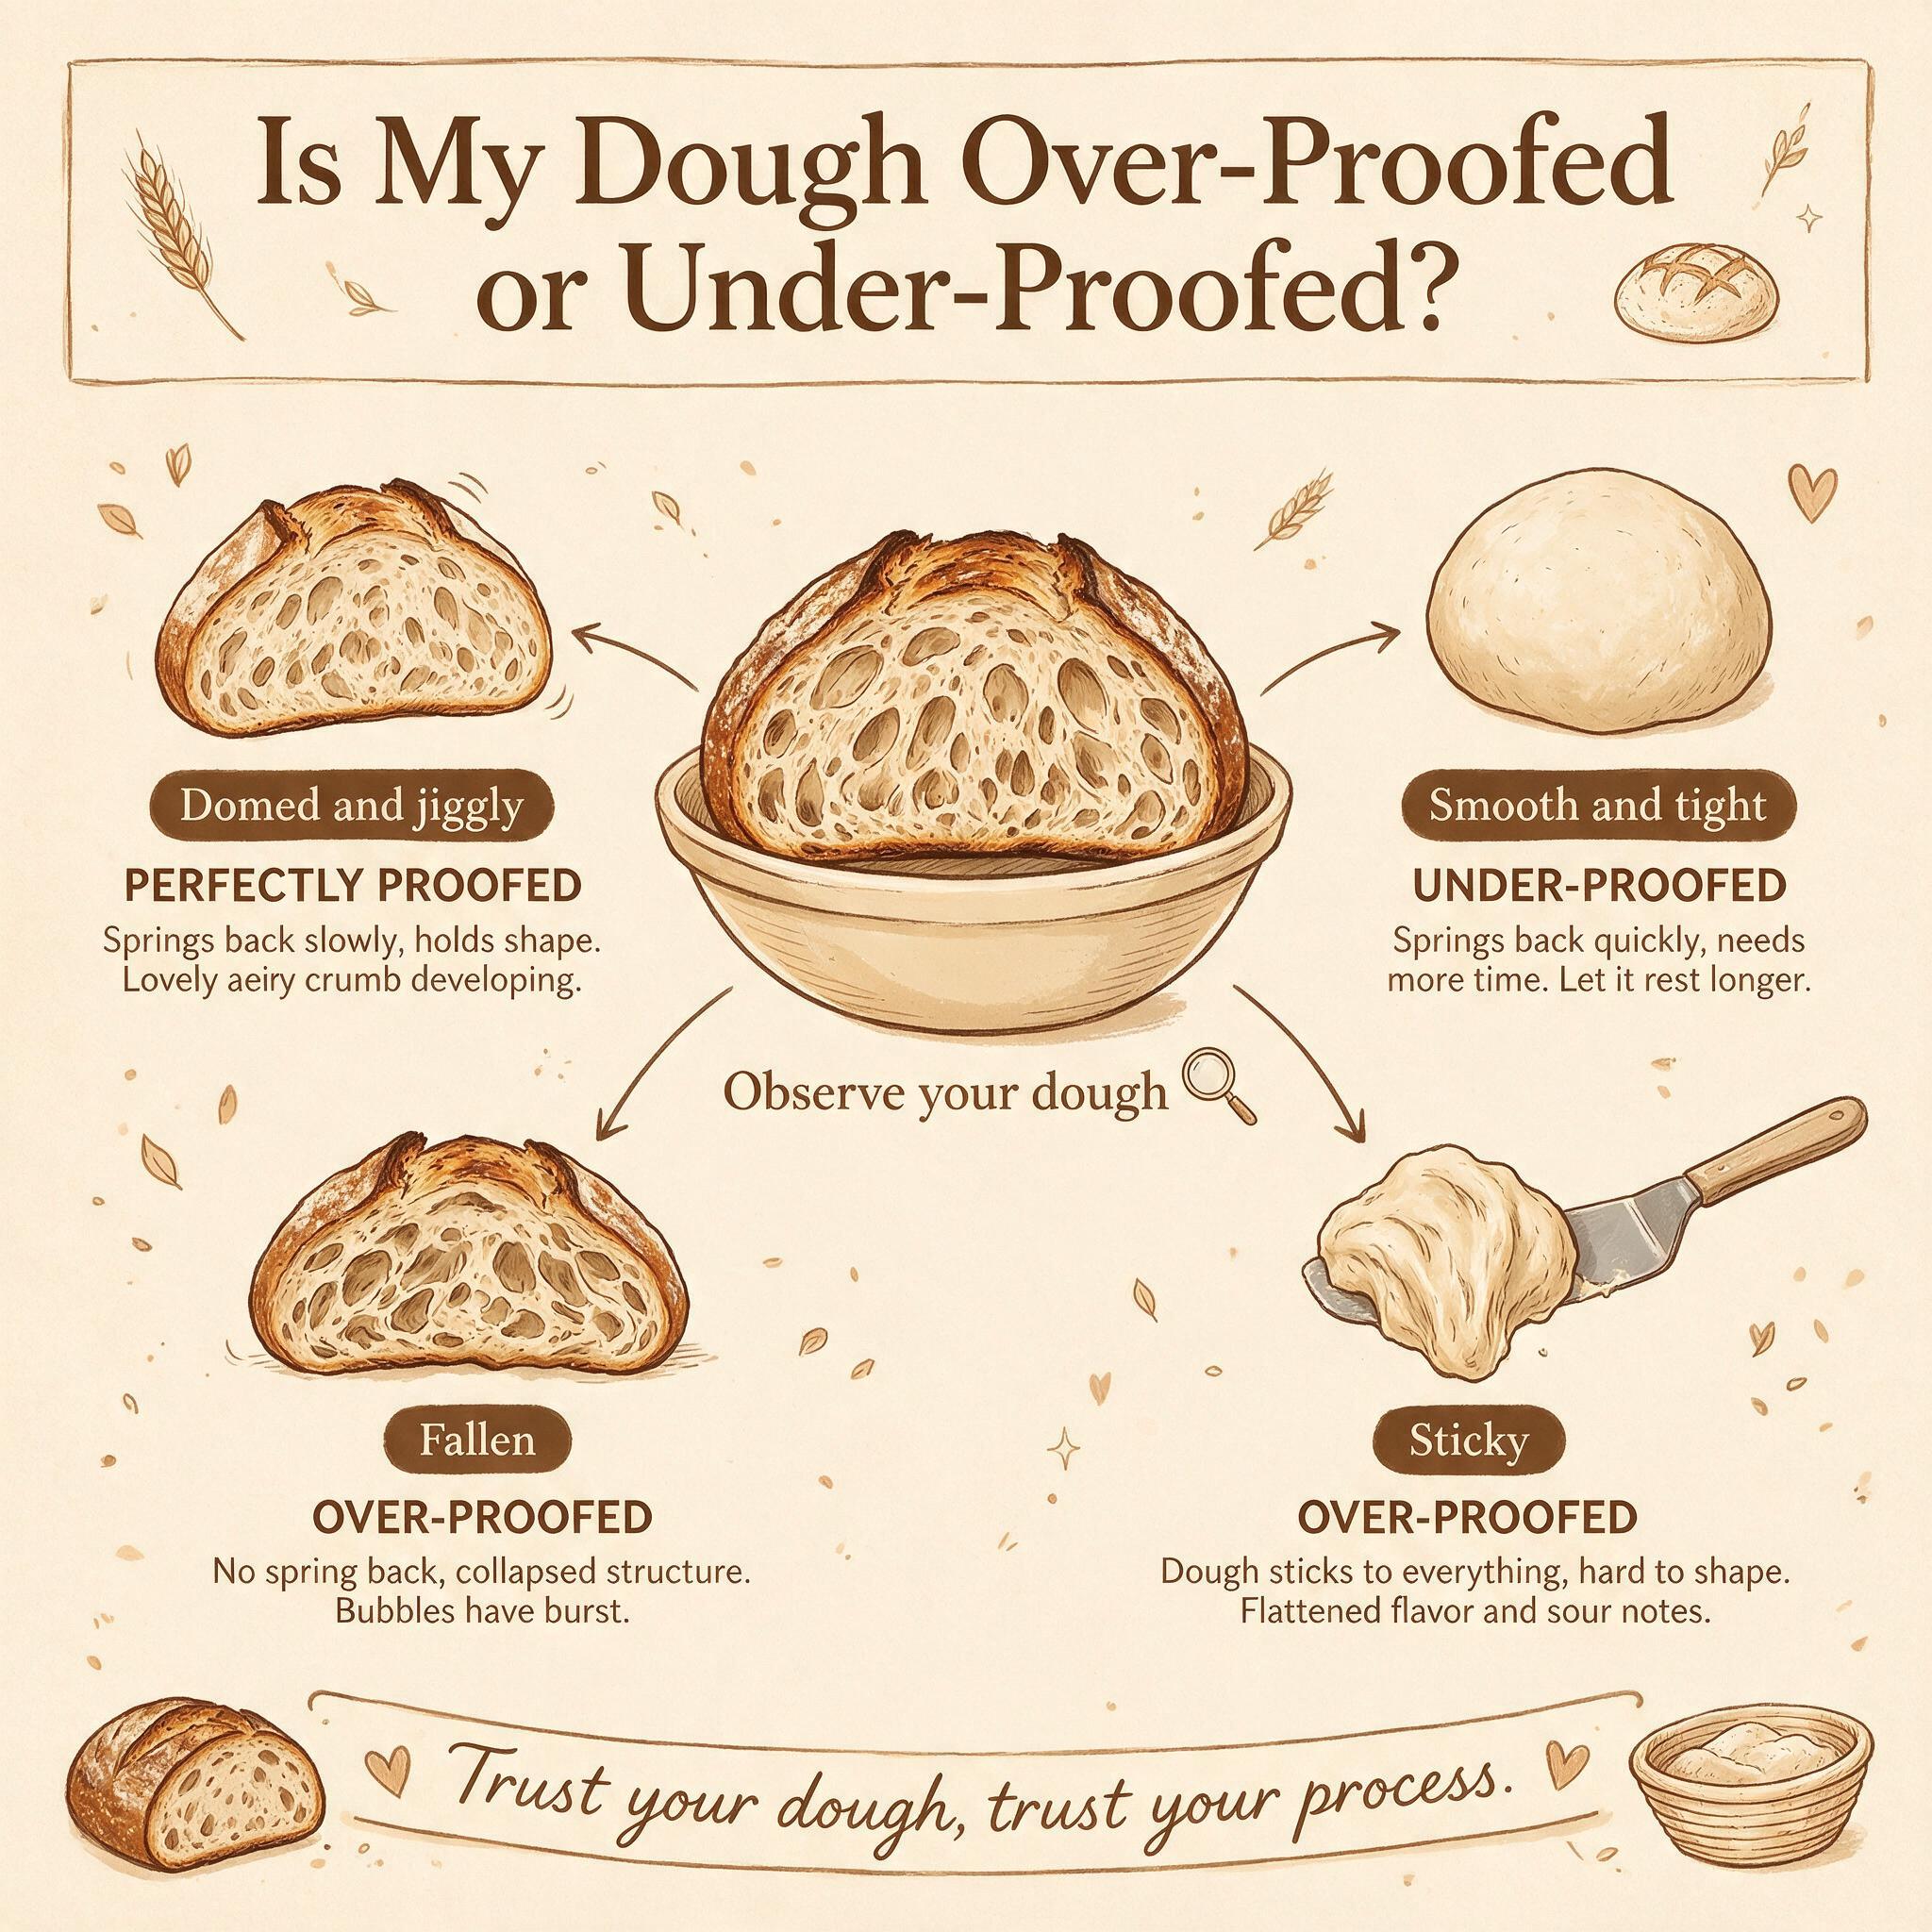
How do I know if my dough is underproofed or overproofed?
Use two tools: the aliquot jar (a clear container where you can see your dough's actual rise during bulk) and the poke test (press a floured finger ½" into shaped dough — it should spring back slowly and incompletely). Underproofed dough springs back quickly with no lasting indentation. Overproofed dough sinks in completely with no recovery. Aliquot jar tracking is more reliable than any visual cue — aim for 60–75% rise at bulk end, not doubled.
My bread is always dense. Where do I start?
Start with proofing. Track your dough's actual rise percentage using an aliquot jar. Most bakers who bake dense loaves are either underproofing (dough hasn't built enough gas structure) or overproofing (gluten degraded). Pick one — usually the first — and adjust bulk time by 30–60 minutes on your next bake. If that doesn't help, check starter activity: was it doubling within four to six hours at room temperature when you used it?
I follow a recipe exactly but my results are different. Why?
Sourdough is deeply personal to each kitchen. Different flour brands absorb water differently. Room temperature changes fermentation speed dramatically (every 10°F shift roughly doubles or halves bulk time). Water chemistry varies by location. Your starter's bacterial population is unique. This isn't a bug — it's the beauty of the craft. Use recipes as starting points, not formulas. Track what works in your kitchen over time and build your own intuition.
Can I fix an already-baked loaf?
Gummy bread: slice it thin and toast it — toasting completes starch gelatinization on the surface and improves texture. Dense bread: use for French toast or breadcrumbs rather than eating plain. Overly sour bread: pair with strong accompaniments (aged cheese, butter, olive oil) that balance the tang. A bad loaf is rarely wasted — it's just a lesson for next time.
Closing Thoughts
Sourdough troubleshooting isn't about finding one magical fix — it's about developing a diagnostic habit. When something goes wrong, don't blame yourself. Ask: "what chain of decisions led here?" Most problems trace back to proofing timing, shaping tension, or starter activity. Address those first before moving on to steam, scoring, and oven temperature.
My personal approach: I use an aliquot jar for every bake now (it takes ten seconds to set up), and I check internal temperature with a thermometer every time. These two habits alone have eliminated 80% of my troubleshooting problems. The rest usually comes down to proofing — give the dough more or less time, and things almost always improve.
Pay attention to how your dough behaves. Take notes if that helps you spot patterns. Trust your eyes more than any timer, and trust your nose more than any recipe. Over time, you'll develop an intuition for what's going on inside your bowl that no guide — including this one — can teach.
Happy baking!
Related Posts
Keep going with these related guides.